Information and Software for the ThinkPad T61(p)
System Type: 6480, 6481, 7658, 7659, 7660, 7661, 7662, 7663, 7664, 7665, 8889, 8890, 8891, 8892, 8893, 8894, 8895, 8896, 8897, 8898, 8899, 8900, 8938, 8939, 6457, 6458, 6459, 6460, 6461, 6462, 6463, 6464, 6465, 6466, 6467, 6478, 6470, 6471
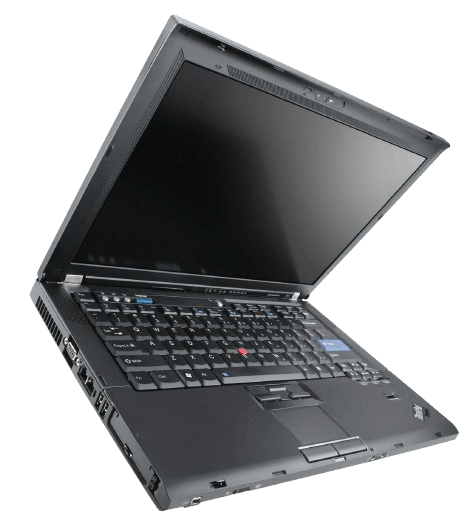
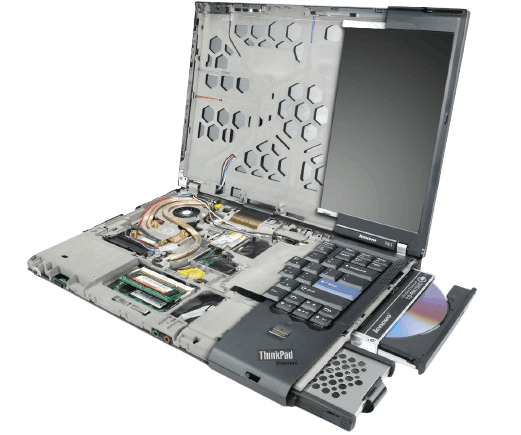
Released in 2007, the T61 series marked a departure from IBM branding as well as a foray into 15.4" widescreen. A lot of the design characteristics were carried over from the T60 series. Most of the T61s came with Merom Core2 CPUs, but later ones came naturally with Penryn; although not as common especially on the 14" fullscreen models (most T61s sold were widescreen instead of fullscreen). The use of Penryn CPUs in Merom-based boards can be achieved through the Middleton BIOS which actually just removes the thermal error on bootup.
The T61 also re-introduced unequal hinges (much like on the T4x series); some consider this to be a negative aesthetic and prefer the T60 chassis as a result.
Downloads
Manuals
- T61 Brochure
- T61(p) 14.1" Hardware Maintenance Manual
- T61(p) 15.4" Hardware Maintenance Manual
- T61(p) Service and Troubleshooting Guide
- Personal Systems Reference Lenovo® ThinkPad® Notebooks 2005 to present - withdrawn
Firmware, Drivers, & Software
- Middleton BIOS (Penryn and whitelist removal support)If you are installing this on a machine that doesn't natively handle Penryn, you'll want to update the BIOS before you install the Penryn CPU
- T61 Nvidia NVS 140M Driver (Windows 7 64-bit)
- SoundMax Audio Driver (Windows 7 64-bit)
- troubadix's TPFanControl (Windows XP, Vista, 7, 8)
- Synaptics Gesture Suite™ Device Driver (Windows Vista, 7, 64-bit)
Nvidia GPU bug
The T61 famously suffers from a bad batch of GPUs Nvidia manufactured with a flawed procedure (a mistake Nvidia didn't realise before it was too late). All OEMs (not just Lenovo) were afflicted by this: perhaps HPs were a bit more prominently as heat highly agitated the flawed ICs? But then nobody really remembers or cares about HPs from this generation.
4:3 T61 Motherboards - IBM to the rescue
Lenovo actually ignored to repair any of the 4:3 T61 motherboards; as a result when the Nvidia chips on them started to fail in the masses, equally defective boards were swapped in until all of the warranties expired and Lenovo didn't have to deal with it anymore: the 4:3 models were only produced during the first span of the T61s lifetime briefly. Basically the 4:3 were a write-off and Lenovo only gave special treatment to the wide screen models that they continued to produce. However since IBM still sold 4:3 T61s to their corporate client base, IBM had to step in and get 4:3 T61 mobos with repaired (good) Nvidia GPUs. So there are 'good' 4:3 Nvidia motherboards floating around all thanks to IBM and not Lenovo.
T601 mods
Already brought up in the T60 page, T61 motherboards can be made to work in T60 chassis with some minor modifications by the use of a hacksaw. And you can also put the 15.4" motherboards in 14.1" chassis for the maximum amount of memory (256 MB) in the smallest form factor. These motherboards have played a huge role in allowing the T60s with their displays to live on with slightly better specifications and performance.
14.1" T61 Motherboards
Here's a list of all 14.1" motherboards from the hardware maintenance manual. To perform a 'T601' mod on a T60, one of these will have to be selected.
System board assembly, Intel Crestline GM with AMT: 42W7648 ← older board w/ false positive thermal sensing error
System board assembly, Intel Crestline GM with AMT: 42W7872 ← native Penryn support
System board assembly, Nvidia NB8M-GS with AMT: 42W7649
System board assembly, Nvidia NB8M-GS with AMT: 42W7873
System board assembly, Nvidia NB8P-GL with AMT: 42W7650
System board assembly, Nvidia NB8P-GL with AMT: 42W7874
Specifications
----CPU Options----
*Intel Core 2 Duo
----Audio----
*SoundMax
----Video----
*Intel Graphics, nVidia GeForce/Quadro
----Memory----
8GB Max
ThinkPad T61 Wiki Mirror
Developed by John McDonnell and Thinkpads Forum's TuuS
Amalgamated & updated by ibmfiles (June 13, 2026)
T61 Wiki Index: BIOS, Hard Drive, RAM Support, CPU Options, Motherboards, Nvidia GPU Issues, Operating Systems and Drivers, Wireless Networking, UltraBay, Batteries, Thermal Management, CPU Undervolting and Throttling, Multi-Touch Gestures (Touchpad), Hardware Modification & Repair, Windows Adjustments, Documentation
Content Index: How to Enable Intel Dynamic Acceleration (IDA) on Both Cores of a Core 2 Duo, Middleton BIOS: Ultimate R61/T61/X61/X300 BIOS (inc SATA-II), T61 Thermal Sensor, How to Enable Intel Dynamic Acceleration (IDA) on Both Cores of a Core 2 Duo, (IDA) on Both Cores of a Core 2 Duo (Dual-IDA working on Linux), Mac Lion on Thinkpad T61 with Intel X3100, HCL 10.6.4/Portables, The "Undervolting" Guide
The ThinkPad T61 notebook computer was released in May 2007 as part of Lenovo's premier line. The business-oriented T61 includes high-end features such as a magnesium alloy rollcage, 7-row keyboard, screen latch, Lenovo UltraBay, and ThinkLight. Models included the 14.1" and 15.4" with a 16:10 aspect ratio widescreen, along with traditional 4:3 aspect ratio 14" screens. Although IBM implemented magnesium rollcages in many standard products prior, even in the lowly WorkPad Z50 (it should be noted that Lenovo attempted to add more rigidity with the hexagon cutouts unique to the T61).
BIOS
Install the Middleton BIOS on the ThinkPad T61 to enable the following:
- SATA-II (3 Gbit/s) drive speeds - the stock ThinkPad T61 BIOS limits the SATA interface to 1.5 Gbit/s
- SLIC 2.1 tables - simplify licensing of Microsoft Windows
- Whitelist removal - allow installation of a wider variety of internal components such as wireless cards
- Thermal sensing error fix - allow installation of Penryn-class CPUs on motherboards designed for Merom CPUs
- CTRL-FN key swap (optional)
- Dual-IDA (Intel Dynamic Acceleration) support - allow both cores of CPU to simultaneously run at higher speeds
HARD DRIVE
- Any standard 9.5mm 2.5-inch form factor SATA hard drive can be installed in the ThinkPad T61
- Install a Solid State Drive (SSD) with a SATA-II or faster interface to take advantage of the significant speed increase unlocked by the Middleton BIOS
RAM SUPPORT
- The Intel 965 chipset in the ThinkPad T61 supports up to 8 GB of 200-pin DDR2 PC2 5300 or PC2 6400 non-ECC RAM
- Install two modules of any capacity to enable Dual Channel memory support
- To utilize more than 3.25 GB of RAM a 64-bit operating system must be installed*
*Some 32-bit versions of Windows such as Windows Server 2003 Enterprise and Datacenter editions as well as some 32-bit Linux operating systems do support RAM over 4 GB, but only through PAE.
CPU OPTIONS
The ThinkPad T61 supports the following 800MHz Front Side Bus CPUs:
| Name | Model | sSpec | Frequency | L2 Cache | Class | Power | Lithography | Core Voltage |
|---|---|---|---|---|---|---|---|---|
| T5270 | Core 2 Duo | 1.4 GHz | 2MB | Merom | 35 W | 65 nm | 1.075V-1.250V | |
| T5670 | Core 2 Duo | 1.8 GHz | 2MB | Merom | 35 W | 65 nm | 1.0375V-1.30V | |
| T7100 | Core 2 Duo | SLA4A | 1.8 GHz | 2MB | Merom | 35 W | 65 nm | 1.075V-1.250V |
| T7250 | Core 2 Duo | 2.0 GHz | 2MB | Merom | 35 W | 65 nm | 1.075V-1.250V | |
| T7300 | Core 2 Duo | SLA45 | 2.0 GHz | 4MB | Merom | 35 W | 65 nm | 1.075V-1.250V |
| T7500 | Core 2 Duo | SLAF8 | 2.2 GHz | 4MB | Merom | 35 W | 65 nm | 1.075V-1.250V |
| T7700 | Core 2 Duo | SLAF7 | 2.4 GHz | 4MB | Merom | 35 W | 65 nm | 1.075V-1.250V |
| T7800 | Core 2 Duo | SLAF6 | 2.6 GHz | 4MB | Merom | 35 W | 65 nm | 1.075V-1.250V |
| X7800* | Core 2 Extreme | SLA6Z | 2.6 GHz | 4MB | Merom | 44 W | 65 nm | 1.100V-1.375V |
| X7900* | Core 2 Extreme | SLA33 | 2.8 GHz | 4MB | Merom | 44 W | 65 nm | 1.100V-1.375V |
| T8100 | Core 2 Duo | SLAYP | 2.1 GHz | 3MB | Penryn | 35 W | 45 nm | 1.000V-1.250V |
| T8300 | Core 2 Duo | SLAYQ | 2.4 GHz | 3MB | Penryn | 35 W | 45 nm | 1.000V-1.250V |
| T9300 | Core 2 Duo | SLAYY | 2.5 GHz | 6MB | Penryn | 35 W | 45 nm | 1.000V-1.250V |
| T9500 | Core 2 Duo | SLAYX | 2.6 GHz | 6MB | Penryn | 35 W | 45 nm | 1.000V-1.250V |
| X9000* | Core 2 Extreme | SLAQJ | 2.8 GHz | 6MB | Penryn | 44 W | 45 nm | 1.000V-1.275V |
*Not officially supported by T61 so careful monitoring of temperatures is recommended
MOTHERBOARDS (PLANAR)
| FRU | CPU | Aspect Ratio | GPU | Manufactured | Model | Compatible |
|---|---|---|---|---|---|---|
| 14.1 Widescreen | ||||||
| 41w1487 | Merom | 16:10 | Intel X3100 | 2007 | T61 | T61 R61 |
| 41w1489 | Merom | 16:10 | nVidia nvs140m | 2007 | T61 | T61 R61 |
| 43y9044 | Merom | 16:10 | nVidia nvs140m | 2008-2010 | T61 | T61 R61 |
| 42w7866 | Penryn/Merom | 16:10 | Intel X3100 | 2008 | T61 | T61 R61 |
| 42w7867 | Penryn/Merom | 16:10 | nVidia nvs140m | 2008 | T61 | T61 R61 |
| 44c3933 | Penryn/Merom | 16:10 | nVidia nvs140m | 2008-2010 | T61 | T61 R61 |
| 14.1 Fullscreen | ||||||
| 42w7648 | Merom | 4:3 | Intel X3100 | 2007 | T61 | T61/p T60/p* R61* |
| 42w7649 | Merom | 4:3 | nVidia nvs140m | 2007 | T61 | T61/p T60/p* R61* |
| 43y9045 | Merom | 4:3 | nVidia nvs140m | 2008-2010 | T61 | T61/p T60/p* R61* |
| 42w7650 | Merom | 4:3 | nVidia fx570m 128mb | 2007 | T61p | T61/p T60/p* R61* |
| 43y9046 | Merom | 4:3 | nVidia fx570m 128mb | 2008-2010 | T61p | T61/p T60/p* T61* |
| 42w7872 | Penryn/Merom | 4:3 | Intel X3100 | 2008 | T61 | T61/p T60/p* R61* |
| 42w7873 | Penryn/Merom | 4:3 | nVidia nvs140m | 2008 | T61 | T61/p T60/p* R61* |
| 44c3924 | Penryn/Merom | 4:3 | nVidia nvs140m | 2008-2010 | T61 | T61/p T60/p* R61* |
| 42w7874 | Penryn/Merom | 4:3 | nVidia fx570m 128mb | 2008 | T61p | T61/p T60/p* R61* |
| 44c3926 | Penryn/Merom | 4:3 | nVidia fx570m 128mb | 2008-2010 | T61p | T61/p T60/p* R61* |
| 15.4 Widescreen | ||||||
| 42w7651 | Merom | 16:10 | Intel X3100 | 2007 | T61 | T61 T61p T60 T60p |
| 42w7652 | Merom | 16:10 | nVidia nvs140m | 2007 | T61 | T61 T61p T60 T60p |
| 43y9047 | Merom | 16:10 | nVidia nvs140m | 2008-2010 | T61 | T61 T61p T60 T60p |
| 42w7653 | Merom | 16:10 | nVidia fx570m 256mb | 2007 | T61p | T61 T61p T60 T60p |
| 43y9048 | Merom | 16:10 | nVidia fx570m 256mb | 2008-2010 | T61p | T61 T61p T60 T60p |
| 42w7875 | Penryn/Merom | 16:10 | Intel X3100 | 2008 | T61 | T61 T61p T60 T60p |
| 42w7876 | Penryn/Merom | 16:10 | nVidia nvs140m | 2008 | T61 | T61 T61p T60 T60p |
| 44c3928 | Penryn/Merom | 16:10 | nVidia nvs140m | 2008-2010 | T61 | T61 T61p T60 T60p |
| 42w7877 | Penryn/Merom | 16:10 | nVidia fx570m 256mb | 2008 | T61p | T61 T61p T60 T60p |
| 44c3931 | Penryn/Merom | 16:10 | nVidia fx570m 256mb | 2008-2010 | T61p | T61 T61p T60 T60p |
*modification required to install 4:3 T61 board in 4:3 T60 or R61 models. These hybrids are commonly referred to as "FrankenPads"
Motherboards designed to use Merom CPU can run a Penryn CPU if Middleton BIOS is installed. This modified BIOS will suppress a false thermal sensing error generated by the boards inability to read the Penryn CPU's more advanced digital temp sensor. This BIOS will NOT provide full Penryn support.
Identifying information for a T61 motherboard can be found on a label under the battery or under the RAM modules.
NVIDIA GPU MOTHERBOARD ISSUES
There is a well known issue with the nVidia discrete graphic system used on T61 series ThinkPads. It was first discovered in 2007 that these GPU chips were experiencing a greater than anticipated rate of failure. Although the rate of failure is believed to be low, perhaps less than 1%, with millions of units produced this adds up to a significant number. nVidia began addressing the problem as early as February 2008, but neither nVidia nor Lenovo ever admitted publicly that the chips were defective. The issue was handled as one of quality control with no "official" revisions issued, and no recalls. Failure rates sharply declined after February 2008, but it wasn't until July 2008 that Lenovo removed the subject motherboards from production, replacing them with cards based on a new shipment of GPU chips.
Laptops with production date code of 08/08 (2008/August) and later are NOT affected, assuming the original motherboard is still present.
Production of the T61 series was cancelled after August 2008, but a few special order system were made in September and October 2008, and boards with the new GPU design continued to be produced until about 2010. The supply of new boards was quickly exhausted, however, and currently only refurbished boards are provided by Lenovo/IBM service. Some boards refurbished by Lenovo contain new Genuine GPU chips, while others appear to have the older original chips.
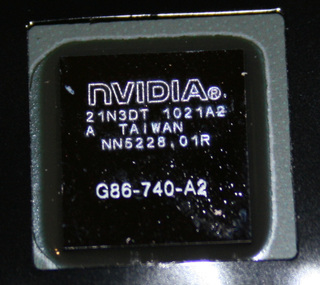
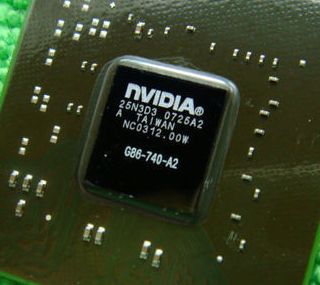
Newer (left), older (right)
To determine which chips a board contains it is necessary to examine the chip itself which bears a four digit date code represented by yy/ww (year/week). The (new) example linked above was manufactured in 2010, 21st week and the older one 2007, 25th week. Original boards from ThinkPads manufactured in August 2008 vary from 0820 to 0829. Since there were many production lines and many factories producing these chips, the actual date on the chip isn't a conclusive way to demonstrate the chip is the improved version. The date on the laptop itself is the key factor.
There have also been reports of counterfeit chips, most likely re-badged chips that were pulled from old boards, being used in boards refurbished by third parties.
Lenovo attempted to address this problem by offering free out-of-warranty repairs to anyone experiencing this problem. This free repair program ran from March 1st 2010 until March 31st 2011. Since this date there has been no further help offered by Lenovo, but the Lenovo community forum had been helpful in assisting members.
OPERATING SYSTEMS and DRIVERS
- Lenovo/IBM ThinkPad T61 Recovery Discs - Windows XP Pro SP2 (x86) [External Link]
- Lenovo/IBM ThinkPad T61 Recovery Discs - Windows Vista Business RTM (x86) [External Link]
- Lenovo official drivers and software - stored in the (End-Of-Line) Device Drivers File Matrix [External Link]On that page select: Type: Laptop & Tablets, Series: Thinkpad T Series, SubSeries: Thinkpad T61 (or T61p)
- Linux installation guides for ThinkPad T61 [External Link]
- Apple OS X Lion 10.7 installation guide for ThinkPad T61 with Intel X3100 video chipset
- Apple OS X Snow Leopard 10.6.4 installation guide for ThinkPad T61 with Intel X3100 video chipset
WIRELESS NETWORKING
The Intel Wireless WiFi Link 4965AGN PCIe Mini Card network adapter is the most capable internal WiFi adapter that shipped with the ThinkPad T61 (42T0865, 42T0867, 42T0869, 42T0871, 42T0905). Since it's now 2026 this WiFi adapter is absolutely ancient and no longer applicable today, you probably want to install something like a: REKONG MPE-AXE3000H WiFi 6E Mini PCIe Card, this requires the middleton BIOS to bypass the whitelisting.
ULTRABAY SLIM DRIVE
The ThinkPad Super Multi-Burner Ultrabay Slim Drive is the most capable optical-media drive available for the ThinkPad T61.
- Records DVD video to DVD+R/-R for playback in most consumer DVD players
- Records to DVD+R/-R Double Layer (DL), DVD-RW and DVD+RW media
- Full specifications and users guide
- FRUs: 39T2677, 39T2679, 39T2829, 39T2851, 39T2855, 42T2501, 42T2506
BATTERIES
- 3-cell 2900mAh 10.8V - Ultrabay battery - up to 1.2 hours of charge time | FRU: 57Y4536
- 4-cell 2600mAh 14.4V - up to 3.6 hours of charge time | FRU: 41U3196
- 6-cell 5200mAh 10.8V - up to 5.5 hours of charge time | FRU: 41U3198
- 9-cell 7800mAh 10.8V - up to 8.6 hours of charge time | FRU: 43R2499
THERMAL MANAGEMENT
- TPFanControl by troubadix: latest common version of TPFanControl for Windows 8 / 7 / Vista / XP, 32/64bit, Celsius/Fahrenheit, service/non_service
- Cleaning and reapplication of thermal compound [External link]
- Thinkpad T61 Heat Problem Fixarticle can be summarised as "use Arctic Silver 5", which should be a given for ANY machine in my opinion. The best solution to run a T61 cool is using an Intel GPU board with the beefed up Nvidia cooler FRU.
- Thinkfan (Ubuntu), see below:
- Install the package Thinkfan by entering the following command in the terminal:
sudo apt-get install thinkfan - Configure Thinkfan with the following command in the terminal:
sudo gedit /etc/modprobe.d/alsa-base.conf
add the following line to the bottom of this file:
options thinkpad_acpi fan_control=1 - Set Thinkfan to automatically start at boot by entering the following command:
sudo gedit /etc/default/thinkfan
edit the line that reads: START=no
to read: START=yes
save and exit gedit - Set temperature thresholds by entering the following command:
sudo gedit /etc/thinkfan.conf
uncomment (remove the # sign) on the line that reads:
#sensor /proc/acpi/ibm/thermal …
change the temperature settings as desired
save and exit gedit - Restart the computer for the settings to take effect.
CPU UNDERVOLTING and THROTTLING
The maximum CPU clock speed may be limited when the system is operated on the 65W AC adapter and no battery is installed. Source: Lenovo ht075965 (support document now lost media). By reducing voltage the CPU will run cooler and draw less power, usually providing an extra 10 to 30 minutes of battery life. CPU speeds can also be throttled to reduce temperatures and extend battery life. As it's now been nearly two decades, none of the original batteries will work well anymore (unless you manage to re-cell them which is insanely difficult, or get a dubious 3rd party battery), so the primary practicality of undervolting is to reduce temperatures.
- RightMark CPU Clock Utility (Windows) 64-bit drivers (required for installation on Windows 64-bit)
- Undervolting Guide for configuring RightMark CPU Clock Utility
- Video Tutorial for configuring RightMark CPU Clock Utility (Windows), original source
- Windows 7 Power Options can also be configured to throttle CPU speed and extend battery life, by setting a hard cap on "maximum CPU %", it can dramatically reduce temperatures.
- Undervolting Guide for configuring phctool in: Ubuntu 11.04, Ubuntu 11.10, and Ubuntu 12.04
- For other power saving options in Ubuntu, see below:
CPU POWER SAVING SETTINGS for UBUNTU 12.04
Use these steps to set up CPU power saving options in Ubuntu 12.04
1. From Ubuntu Software Center install:
2. CPUFreq will automatically run at startup and appear in the panel.
3. Set Hardware Sensors Indicator to run automatically at startup by adding the following to Startup Applications:
Name: Hardware Sensors Indicator
Command: indicator-sensors
4. Edit /etc/rc.local by entering the following command in the terminal: sudo gedit /etc/rc.local
5. Add the following line to rc.local before the command "exit 0" to set your CPU to powersave mode automatically at startup: cpufreq-set -g powersave
6. To automatically set a different mode at startup, substitute 'powersave' with 'ondemand' or 'conservative' or 'performance'
- For other cpufrequtil options: How to use cpufrequtils
- For other monitoring applications: What Application Indicators are available?
MULTI-TOUCH GESTURES (TOUCHPAD)
Windows: The touchpads on most models of the ThinkPad T61 are capable of multi-touch features, including two-finger scrolling, with the proper touchpad driver.
- Go to Control Panel > Programs and Features
- Uninstall Lenovo UltraNav driver + Lenovo UltraNav utility (if present)
- Download and install the Synaptics Gesture Suite™ Device Driver (Windows Vista / 7, 64-bit)
- Restart the computer
Linux: Two-finger scrolling should work without any special configuration in Ubuntu. If not, see below:
ENABLE TWO-FINGER SCROLLING in UBUNTU on the THINKPAD T61 and T400
If two-finger scrolling does not function correctly in Ubuntu, follow this procedure to force-enable it.
1. Open a terminal (ctrl + alt + t) and launch gedit with the following command: gedit
2. Paste the following into the new document that is now open:
#!/bin/bash
# Enable two-finger scrolling
synclient HorizTwoFingerScroll=1
synclient VertTwoFingerScroll=1
synclient EmulateTwoFingerMinZ=48
synclient EmulateTwoFingerMinW=8
4. Save this file as two-finger_scroll.sh in your home folder
5. From the terminal, enter the following command to make the file executable: sudo chmod +x two-finger_scroll.sh
6. From the Dash, search for Startup Applications and launch it
7. Click the 'Add' button and enter the following:
Name: Enable two-finger scrolling
Command: /home/[your user name]/two-finger_scroll.sh
8. Click 'Add'
9. From the terminal, enter the following commands to create a trigger that will re-enable two-finger scrolling when the computer wakes from suspend or hibernation:
sudo touch /etc/pm/sleep.d/99-twofinger
sudo chmod 755 /etc/pm/sleep.d/99-twofinger
sudo gedit /etc/pm/sleep.d/99-twofinger
10. Paste the following into the new document that is now open, replacing [your user name] with your user name (without the brackets):
#!/bin/sh
case "$1" in
        thaw|resume)
        DISPLAY=:0.0 su `who | grep tty7 | sed 's/\([a-z]*\).*/\1/'` -c '/home/[your user name]/two-finger_scroll.sh'
        DISPLAY=:0.0 su `who | grep tty8 | sed 's/\([a-z]*\).*/\1/'` -c '/home/[your user name]/two-finger_scroll.sh'
        ;;
        *)
        ;;
        esac
exit $?
11, Click 'Save'
12. Restart your computer and two-finger scrolling should work
13. Some recent versions of Ubuntu may require the following for the script to run correctly at startup: sudo chmod +777 two-finger_scroll.sh
HARDWARE MODIFICATION & REPAIR
- Add WWAN antenna and SIM card slot
- Replace loose or broken hinges
- Clean or replace fan
- W500/T500 Fan Mod
- To add a webcam, purchase these FRUs: Camera - 42T3106, LCD Cable - 93P4376, LCD Bezel Kit - 42X5059. Alternatively you can just drill the bezel if you don't wish to buy the bezel kit itself, but keep in mind the magnesium should be repainted, else it will start to corrode where the drilling has exposed it.
WINDOWS ADJUSTMENTS
- Windows Tweaks & Adjustments (98, Vista, 7, 8, 10)
DOCUMENTATION
- Hardware Maintenance Manual - ThinkPad R61, R61i and T61 14.1" widescreen | Hardware Maintenance Manual - ThinkPad T61,T61p 14.1" fullscreen
- Hardware Maintenance Manual - ThinkPad T61, T61p 15.4" widescreen
- Service and Troubleshooting Guide - ThinkPad T61, T61p
- Personal Systems Reference Lenovo ThinkPad Notebooks 2005 to present - withdrawn
- ThinkPad T61 Brochure
How to Enable Intel Dynamic Acceleration (IDA) on Both Cores of a Core 2 Duo
Archived source obtained from: http://forum.notebookreview.com/windows-os-software/477704-how-enable-intel-dynamic-acceleration-ida-both-cores-core-2-duo.html
ThrottleStop 2.00 Beta 16
First I'd like to thank somebody over at TechPowerUp who introduced me to this little trick. 🙂
Intel Dynamic Acceleration (IDA) on Core 2 Duo CPUs is designed so that the CPU will use a higher multiplier (faster speed) but Intel designed this feature so that only a single core at a time can benefit from this turbo boost. The second core has to be in the C3/C6 sleep state for this to work. As soon as the second core wakes up to process some background task; the maximum multiplier will drop back to the default multiplier. When the second core is finished and goes back to sleep, the first core can go back up to the higher speed by switching to the IDA multiplier.
IDA mode is available in most of the T7000, T8000, P8000 and T9000 series of mobile Core 2 Duo CPUs.
There is finally an easy way to enable IDA mode on both cores at the same time so it doesn't cycle on and off like Intel intended. When testing on a T8100, this resulted in a 9% performance boost when running the multi-threaded benchmark wPrime.
Unfortunately, not all laptops are capable of enabling Dual IDA mode. You need to be able to toggle the SpeedStep (EIST) bit from within Windows. On the Dell D830 I tested, there is an option in the bios so you can disable SpeedStep / EIST but many manufacturers lock the EIST bit and don't provide any option to unlock it. If you don't have this bios option and ThrottleStop shows that the EIST bit is grayed out, that means it is locked and you won't be able to use this trick.
Here's what worked for me.
1) Enter the bios and disable Enhanced Intel Speedstep® (EIST).
2) After you boot up, start up ThrottleStop. It should look something like this.
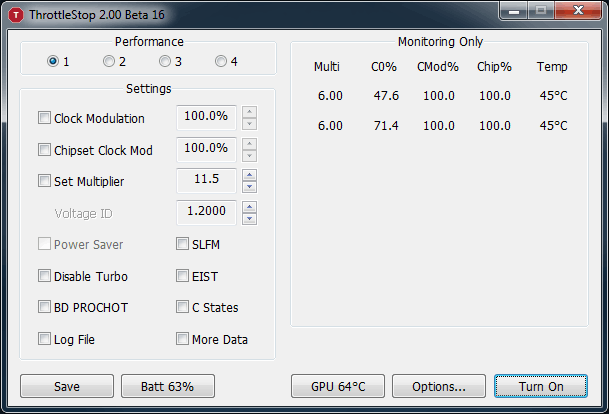
The multiplier will be stuck at the default minimum which is 6.0. Adjust the multiplier to the highest possible value, set the Voltage ID which is the voltage your CPU will use and check the Set Multiplier box. Click on the Turn On button and then click on the EIST option. You should see the multiplier start to jump around in the monitoring area like this. If the multiplier is not above your default multiplier then make sure that you set the Minimum processor state to 100% in the Control Panel -> Power Options.
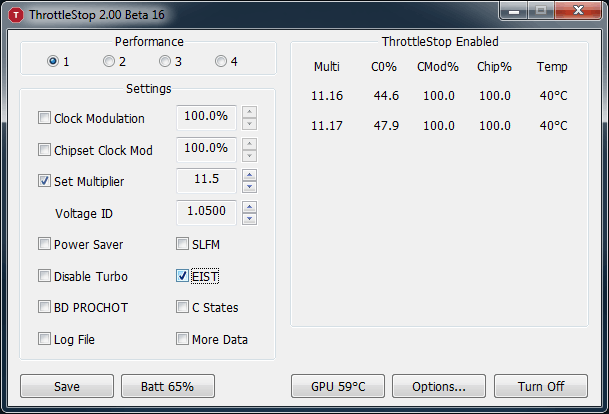
The trick now is to disable EIST. This should force the CPU to lock both cores so that they will both be using the highest IDA multiplier. The T8100 I tested has a default multiplier of 10.5 and the IDA multiplier is 11.5. After I disabled EIST, the CPU multiplier gets stuck at 11.5 on both cores. 😁
You can run any sort of program you like and you can stress both cores as much as you like but it won't budge. By lowering the VID voltage to a safe and stable amount, you can run both cores at full speed without creating a lot of heat.
The Intel 45nm T8100 I tested is so efficient that there doesn't seem to be any significant increase in idle power consumption when locked like this. With a Kill-a-Watt meter I couldn't measure any difference. It seems that at idle, the CPU turns itself mostly off no matter what settings you use so this little trick shouldn't significantly change idle power consumption or increase your CPU temperature.
Here's the final result. Both cores are fully loaded while the IDA multiplier is fully engaged on both cores. Core temperatures look great too.
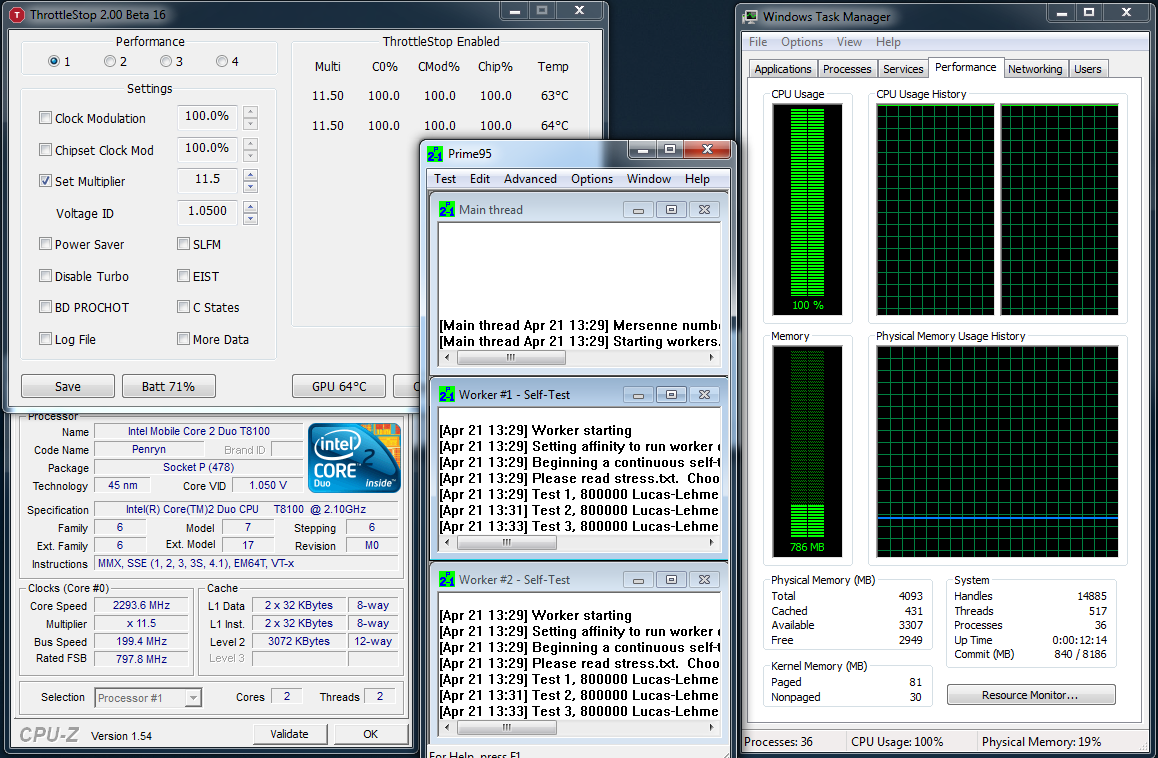
If this trick works or doesn't work for you then post your results and let me know what type of laptop you have and what bios version it is using. Unfortunately some of the Acer laptops don't give you an option in the bios to disable EIST so you are out of luck.
When EIST is disabled, ThrottleStop will not be able to control your multiplier anymore. It will still be able to monitor your CPU and you can use it to lock the clock modulation values but adjusting the multiplier and VID will have no effect. On my laptop, SLFM was also automatically disabled when I booted up with EIST disabled.
If you want the operating system to get control of your multiplier then you will need to enable EIST before you exit ThrottleStop. I left it this way so once you set your CPU to use the IDA multiplier full time, you don't even need to leave ThrottleStop running. Your CPU will continue to use your locked IDA multiplier until you manually enable EIST.
Middleton BIOS: Ultimate R61/T61/X61/X300 BIOS (inc SATA-II)
Archived source obtained from: http://forum.notebookreview.com/6501443-post75.html
There is also a mirror at ThinkWiki: Middleton's BIOS, the ThinkWiki version simplifies the BIOS downloads and limits them to the dual IDA instances (which if you are confused, are the ones that you should be using as well for the best performance). The ones under "modified BIOS file" are non-dual IDA support.
DISCLAIMER: Use these modified bios at your own risk!!
These modified bios have been beta tested to confirm they do not brick the system after flash. However data integrity tests take time and it's up to the user to confirm there is no data loss due to the increased SATA-II interface speed. You will be solely responsible for any damage to your computer system or loss of data that results from flashing or using of the patched BIOS.
Lenovo have never tested or approved these patched bios and doesn't support them. They are provided "as is" without any warranties from Lenovo. These bios-es are completely unofficial releases.
| ThinkPad model : machine type | modified BIOS file | SATA-II 3 Gb/s | SLIC 2.1 | whitelist removed | Thermal sensing | CTRL-FN swap | Dual-IDA support |
|---|---|---|---|---|---|---|---|
| X61, X61s | 2.21-1.03 | + | + | + | n/a | + | 2.21-1.03 |
| X61/X61s SXGA+ | 2.21-1.03 | + | + | + | n/a | + | 2.21-1.03 |
| X61 Tablet | 1.24-1.02 | + | + | + | n/a | + | 1.24-1.02 |
| X300 | 1.10-1.01 | + | + | + | n/a | + | 1.10-1.01 |
| T61, T61p R61 (14.1" widescreen with IEEE 1394): 7732, 7733, 7734, 7735, 7738, 7742, 7744, 7751, 7753, 7754, 7755 R61i (14.1" widescreen with IEEE 1394): 7732, 7742 | 2.27-1.08 | + | + | + | + | + | 2.27-1.08 |
| R61 (15" normal screen): 8942, 8943, 8944, 8945, 8947, 8948, 8949 R61i (15" normal screen): 8943 | 1.24-1.00 | + | + | + | n/a | + | 1.24-1.00 |
| R61e R61i (15.4" widescreen without IEEE 1394): 7650 | 2.23-1.08 | + | + | + | + | + | 2.23-1.08 |
| R61 (15.4" widescreen): 8930, 8932, 8933, 8934, 8935, 8936, 8937 R61i (15.4" widescreen with IEEE 1394): 8932 | 2.24-1.08 | + | + | + | + | + | 2.24-1.08 |
| R61 (14.1" widescreen without IEEE 1394): 7732, 7733, 7734, 7735, 7736, 7737, 7738 R61 (15.4" widescreen): 8914, 8918, 8919, 8920, 8927, 8928, 8929 R61i (15.4" widescreen): 8918 | 2.29-1.08 | + | + | + | + | + | 2.29-1.08 |
Note:
- It's recommended to flash the stable BIOS version (column 2) unless you need dual-IDA support.
- At the moment you need to download the separate BIOS package (rightmost column) for using dual-IDA. This BIOS includes all the features of the stable version plus dual-IDA support.
- CTRL-FN swap is optional. Each BIOS package contains two versions of the patch. You can select the version without CTRL-FN swap.
Acknowledgments:
- nando4 for providing all needed information on SATA-II mod. I knew nothing about this issue in 2010 and didn't plan to make any ThinkPad BIOS mods (except for CTRL-FN swap). It was him who convinced me to solve SATA-II problem. Also he literally forced me to add dual-IDA support (he knows what I'm talking about ).
- andyp for his BIOS modding tools and other guys from forums.mydigitallife.info for making SLIC 2.1 integration possible.
- Zender for finding the way of disabling wireless whitelist on ThinkPads. This significantly accelerated the work on the patch (otherwise I would have had to do it myself and it would have taken additional time).
- Leokim for X61/X61s SXGA+ BIOS.
- XStoneX for informing me about "Thermal Sensing Error".
- unclewebb for the ThrottleStop utility which makes dual-IDA possible and kizwan for the "EIST Unlocked Example" guide.
- Brave ThinkPad owners for readiness to test intermediate BIOS versions.
T61 Thermal Sensor
Archived source obtained from: http://forum.notebookreview.com/lenovo-ibm/246748-t61-thermal-sensor-cpu-upgrade.html
I've done some research since my post.
the ability to run a penryn based T8xxx or T9xxx CPU on your T61/p will depend on your motherboard and doesn't have anything to do with the BIOS.
to start go to the IBM warranty page here http://www-307.ibm.com/pc/support/si...LOOK-WARNTY#sw and enter your type and serial number.
You'll then get a page detailing each component in your system with a FRU number.
Scroll down and look for 'SYSTEM PLANAR'. Mine states 42W7652 as the FRU.
From my reviews of what people have got to work on their systems and the maintenance manual I've concluded the following.
Merom based T7xxx CPU's will work on the following motherboards
- 42W7651,
- 42W7652,
- 42W7653, and
- 42W7875.
Penyrn based T8xxx and T9xxx CPU's will work on the following motherboards
- 42W7876, and
- 42W7877.
I hope this helps.
How to Enable Intel Dynamic Acceleration (IDA) on Both Cores of a Core 2 Duo
Archived source obtained from: http://forum.notebookreview.com/windows-os-software/477704-how-enable-intel-dynamic-acceleration-ida-both-cores-core-2-duo-15.html#post6646598
Introduction
An EIST-unlocked bios will provide a full multipler (or half for 1066Mhz FSB P8xxx or T9xxx cpus) , gaining 4-17% more CPU performance on any IDA-capable Core 2 Duo/Quad CPU when using Throttlestop. Examples shown on the right. Throttlestop also extends the highest voltage range available which is handy for greater setfsb overclockability and decreases the lowest voltage available for undervolted battery life improvements. Combining dual/quad-IDA and PLL overclocking will give the greatest possible overclocking.
Originally this thread only had Dell/Alienware dual-IDA C2D success stories. Now there is quite a few modded bioses below which allow the system to be dual-IDA overclocked.
| Example of dual-IDA clocked C2D CPUs | |
|---|---|
| SU9300-1.20 → 1.40@x7 SU9400-1.40 → 1.60@x8 SU9600-1.60 → 1.80@x9 SL9400-1.86 → 2.13@x8 SL9600-2.13 → 2.40@9 P8400-2.26 → 2.40@x9 P8600-2.40 → 2.53@x9.5 T9400-2.53 → 2.66@x10.5 T9550-2.66 → 2.8@x10.5 P8800-2.66 → 2.83@x10.5 T9600-2.80 → 2.93@x11 T9900-3.06 → 3.20@x12 Q9000-2.00 → 2.26@x8 Q9100-2.26 → 2.53@x9 Q9200-2.40 → 2.66@x9.5 U7600-1.20 → 1.33@x10 | U7700-1.33 → 1.46@x11 T5270-1.40 → 1.60@x8 L7500-1.60 → 1.80@x9 L7700-1.80 → 2.00@x10 T7250-2.00 → 2.20@x11 T7300-2.00 → 2.20@x11 T8100-2.10 → 2.30@x11.5 T7500-2.20 → 2.40@x12 T7700-2.40 → 2.60@x13 T8300-2.40 → 2.60@x13 T9300-2.50 → 2.70@x13.5 T9500-2.60 → 2.80@x14 |
How to setup Throttlestop to use the extra multiplier the dual-IDA bios provides?
See 2.0's great guide here skipping step 1 and step 2:
STEP 3:
Extract ThrottleStop into a directory on your main drive and run it. Now close ThrottleStop down by right clicking on it in the taskbar and choosing exit. Just needed it to create a configuration file. Go into the ThrottleStop directory and open the configuration file. Scroll to the bottom and set DualIDA=1. Then save it.
Run ThrottleStop again. Check Set Multiplier. Use the up arrow button to select the maximum multiplier. Uncheck EIST. Then hit Turn on. Under Option, check DualIDA on start.
STEP 4:
Run CPU-Z to verify it works.
STEP 5:
Run Wprime while CPU-Z is up to make sure it holds the highest multiplier.
STEP 6:
If everything works, now it's time to lower the voltage to the CPU runs cool. Try 1.100v. Run Wprime 32M test. If that's good, Run Wprime 1024 test. If that went off without a hitch (no BSD) then you're done. You just need to set it up for permanent operation.
LASTLY:
In options for Throttlestop, check "Start Minimized."
Now, go back into the ThrottleStop directory and rightclick on the executable file. Click make short cut. Name it whatever you like. Then drag that short cut link to the StartMenu and place it under the Start Up section so that you will boot up with Dual IDA enabled.
Successful implementations of dual-IDA using ThrottleStop (TS)
Dell/Alienware
Latitude: D830+T9500, D830+T8100, E4300+SP9400, E6400+T9800.
Inspiron: 1520+T7500.
Vostro: 1400+T9300, 1500+T9300, 1500+T7250.
XPS: 16+T9550, M1330+T7500, M1730+T9300.
Studio: 1735+T8300
Dual-IDA with modified BIOS
kizwan's EIST Unlocked Example .PDF explains how to mod your bios to be dual-IDA capable, with the resultant modified bios below:
Acer: 3810T/3810TG, AS4310, EX5220/EX5620/EX5620G/EX5620Z/EX5620ZG/TM5320/TM5720/TM5720G, 5230/5230E/5330/EX5630G/5630/5630Z/5630EZ/5725G/TM5730G/5730, AS5738ZG/5738DZG/5738Z/5738G/5738/5736Z/5736G/5338, 6920G, TM7730/TM7730G/EX7630/EX7630G/EX7630ZG, AS7738G/AS7738/AS7735G, 8731, 8735G, 8935. Eg: 5620G+T5270, 5920G.
Clevo: M570RU
Compal: NBLB2
Gateway: P7805u+P8400
HP: dv4-1xxx/CQ40/CQ45, dv5-1xxx, dv6-1xxx, dv7-2xxx, dv9+T7700, 25x0P/27x0P/6510B.W/6710B.W/6910P.W/85x0P.W/87x0P.W/HDX9000.
Lenovo: R61.i.e/T61.p/X61.s.t/X300, Y450.
Packard-Bell: Ipower GX-M003GE
Quanta: TW8+T5870
Sager: NP5793, NP2096
Sony: VGN-AR760U, SZ56
Toshiba: Qosmio X300
Other notes
- dual-IDA can be enabled on Linux as described
- T4xxx/T6xxx/SU4100/SU7300 CPUs have no IDA support
- Appears all other systems except Dell/Alienware have EIST locked down, so require a modded bios.
- The 2510P's u7600 was single-IDA capable even prior to applying the modded bios however it was inactive. It required TS to activate IDA. Running TS in the background will maintain single-IDA as will exiting TS *only* if using a High Performance profile with minimum CPU set to 100%. Single-IDA increased the 2510P's Win7 WEI by 0.2 points as shown here.
(IDA) on Both Cores of a Core 2 Duo (Dual-IDA working on Linux)
Archived source obtained from: http://forum.notebookreview.com/windows-os-software/477704-how-enable-intel-dynamic-acceleration-ida-both-cores-core-2-duo-35.html#post7717709
Briefly, I was able to engage dual-IDA on my 2530P while running Linux using specific codes for my L9400 (non-IDA=x7/1.86Ghz, IDA=x8/2.13Ghz) in the spoiler improving a prime95 run from 197.098ms to 173.248ms (12%)/
[Worker #1 Jul 19 11:58] Timing 10 iterations of 8192K FFT length. Best time: 196.833 ms., avg time: 197.098 ms.
[Worker #1 Jul 19 12:05] Timing 10 iterations of 8192K FFT length. Best time: 173.023 ms., avg time: 173.248 ms.
#############################
## CPU MSRS based off http://img223.imageshack.us/img223/6914/msr.png
##
## 0xCE: 7:0  - min VID
##       12:8 - absolute minimum FID (SLFM)
##       39:32 - absolute max VID
##       44:40 - absolute max FID (IDA)
##
## 0xEE: 28:28 - SuperLFM (1)
##
## 0x198 (IA32_PERF_STATUS)
##      7:0 - Current VID
##      12:8 - Current FID
##      14:14 - HALF (1)
##      15:15 - SLFM (0)
##
##       39:32 - current max VID
##       44:40 - current max FID
##       46:46 - HALF (1)
##       47:47 - SLFM (0)
##       55:48 - current min VID
##       60:56 - current min FID
##
##
## 0x199 (IA32_PERF_CTL)
##       7:0 - requested VID
##       12:8 - requested FID
##       14:14 - HALF (0)
##       15:15 - SLFM (0)
##
## 0x1A0 (IA32_MISC_ENABLE)
##       16:16 - EIST (1)
##       20:20 - LOCK (0)
##       38:38 - IDA (0)
##############################
# rdmsr 0x198
rdmsr: open: No such file or directory
## Load msr module
# modprobe msr
# rdmsr 0x198
617071c06008611
## Set governor to performance
# echo performance > /sys/devices/system/cpu/cpu0/cpufreq/scaling_governor
# echo performance > /sys/devices/system/cpu/cpu1/cpufreq/scaling_governor
## Check existing VID/FID of both codes
# rdmsr -p0 0x198
617071c0632071c
# rdmsr -p1 0x198
617082706000827
## Check the required VID/FID for both cores
# rdmsr -p0 0x199
827
# rdmsr -p1 0x199
827
## EIST is bit 16 of 0x1a0 - need to toggle that
# rdmsr 0x1a0
1364872488
# wrmsr 0x1a0 0x1364862488
## Check if both cores are running x8
# rdmsr -p1 0x198
617071c0600071c
## Toggle EIST again
# wrmsr 0x1a0 0x1364872488
# rdmsr -p0 0x198
617071c0632071c
# rdmsr -p1 0x198
617071c0632071c
# rdmsr -p1 0x198
827
## Toggle EIST again
# wrmsr 0x1a0 0x1364872488
# wrmsr 0x1a0 0x1364862488
# rdmsr -p1 0x198
617071c06000827
# rdmsr -p0 0x198
617071c06000827
## BOTH cores are running x8
It's easy for me to write a script that writes hardcoded values to my CPUs MSR to enable dual-IDA and undervolt the CPU. However I was wondering if anybody might want to write a Throttlestop for Linux wrapper that uses rdmsr/wrmsr? Would be handy to have a generic tool to set VID/FID/IDA/EIST/c-states/dual-IDA.
The exact same thing could be achieved on MacOS if there's a rdmsr/wrmsr equivalent utility.
Mac Lion on Thinkpad T61 with Intel X3100
Archived source obtained from: https://www.insanelymac.com/forum/topic/264571-mac-lion-on-thinkpad-t61-with-intel-x3100/
Note: I was having a tough time tracking all of these files, so I am leaving the unlinked.
I’ve decided to start this post to help anyone out there who is trying to install Lion on a Lenovo T61 notebook with X3100 video chipset. For those of you who have NVidia video chipset, I’m sorry but there is no way to enable QE/CI for your video chipset yet.
To install Mac Lion on your machine you will need the following:
1. A working OSX installation.
2. A USB drive of minimum 8GB
3. Conti’s “MyHack” installer witch you can get here: http://osx86.sojugarden.com/2011/07/myhack-2-0-rc1/
4. Install OS X Lion.app or InstallESD.dmg from the Install OS X Lion.app
Step 1:
Mount MyHack.dmg and copy the MyHack.app to /Applications, because it can not run from the dmg’s read-only file system.
Make sure that you have inserted your USB drive, which you will use. Run the MyHack.app, select the install type: “Create OS X 10.7 Install Disk”. You can use Conti’s installer to create a Snow Leopard bootable USB drive as well, please refer to his guide for more information: http://osx86.sojugarden.com/guide/ .
MyHack will ask you for administrative password, please enter it. Select the target volume (your USB flash!) to run MyHack on. The installer will now ask you to choose between automatically locating the Lion.app or to browse manually for it.
MyHack will then prompt to warn you that all data on the target you selected will be erased. Once you press ok it will ERASE all data on the target volume you selected and copy the files to it.
Step 2:
If everything is configured properly, you should be able to boot from your USB device.
From this point run a normal OS X installation, however you want.
Step 3:
After starting up Lion for the first time and making all the necessary settings, after you make it to your desktop go and open finder, go to your USB device, locate and copy MyHack again to /Applications folder. Run the app, this time choosing “Install Chameleon + Extra” option and set the target to “/”. It will install the boatloader and Extra folder.
Step 4:
Until now I had problems with the following:
- PS2 kext; my keyboard wasn’t recognized, so I had to replace the AppleACPIPS2Nub.kext and ApplePS2Controller.kext with the ones from SL. I installed this to Extra folder.
- I’ve replaced Conti’s generic FakeSmc with my own;
- Removed AppleHDA from S/L/E and installed VoodooHDA, but it is still causing KP, this is a problem I didn’t solved totally yet ☹ (if anyone can help me with this problem please do, because out of 5 power up’s, 2 of them are KernelPanics)
- Replaced IOAudioFamily with the one from SL to resolve problems regarding sound buffering, that I had;
- For battery I’ve installed Voodoo Battery and AppleACPIPlatform,
sometimes battery is recognized and sometimes it just appears with an “x”.
I’ve also used MaLd0n DSDT auto-packer to generate my dsdt : http://www.insanelymac.com/forum/index.php?showtopic=235523 , I’ve placed it in the Extra folder, to get my Bluetooth working and hopefully my fingerprint reader. For now Upek is working on True Suite for Mac (http://support.authentec.com/KnowledgeBase/KBview/tabid/843/ArticleId/335/TrueSuite-for-MAC-OS-X-10-7-aka-Lion.aspx ) and I’m hoping it will work for me because it’s working in SL with DSDT.
For those of you who are trying to get X3100 working, the only way I got it to work is to edit org.chameleon.Boot.plist and add arch=i386 with Graphics Enabler->Yes.
I have attached my DSDT, though I don’t recommend using it, if do, use it at your own risk!
Also I’ve attached the text I’ve used.
This post is meant to be a guide, for questions regarding the installer, please refer to Conti, he will help you. I must say that without his help I woudn’t be writing this guide from my Lion installation. Thank you very much Conti and good luck to all Thinkpad T61 users, I will try to help you in any way I can.
AppleACPIPS2Nub.kext.zip
ApplePS2Controller.kext.zip
fakesmc.kext.zip
VoodooHDA.kext.zip
VoodooTSCSync.kext.zip
dsdt.aml.zip
HCL 10.6.4/Portables
Archived source obtained from: http://wiki.osx86project.org/wiki/index.php/HCL_10.6.4/Portables#Lenovo
Thinkpad T60p (2007-CQ8)
- Geekbench:
- Upgraded from 10.6.2 after DSDT patching by using Silencer's method
- AsereBLN 1.1.9 Bootloader (based on Chameleon 2RC4)
- Unmodified /S/L/E (no dependancy issues)
- C-States Appear to Work (Vanilla Speedstepping)
- Sleep - WORKS
- Lid Close - WORKS
- TimeMachine - WORKS (make sure to enter your HW UUID into the sparsebundle)
- Video at 1400x1050 with full CI/QE (Using RadeonHD but also works with DSDT patching of X1600 and ATINDrv.kext framebuffers)
- Sound works with VoodooHDA and Mic works too
- UltraNav works with ApplePS2Controller in /E/E
- Still investigating slightly hotter CPU temps despite correct C-States on Core Duo CPU
Thinkpad T61 (8895-2FG)
- Install Method: Vanilla Snow Leopard DVD + tonymacx86 iBoot (Supported).
- Bootloader: Kabyl's Chameleon 2 RC5
- files in /Extra/: com.apple.boot.plist (with arch=i386), smbios.plist (MacBook5,1), dsdt.aml
- Best way to edit Chameleon settings: Lizard
- kexts in /Extra/Extensions: AppleACPIBatteryManager.kext, AppleACPIPS2Nub.kext, AppleHDADisabler.kext, fakesmc.kext, Intel82566MM.kext, IONetworkingFamily.kext (Version 1.9), VoodooPS2Controller.kext, VoodooTSCSync.kext (special edition)
- additional kexts in /S/L/E/: VoodooHDA.kext,
32bit: everything works (except sleeping). Geekbench score 2866. Didn't try 64bit.
- Update to 10.6.8 did work, if you see configd crashing all the time and airport not working, add SMboardproduct to your smbios.plist:
    <key>SMboardproduct</key>
    <string>Mac-F42D86A9</string>
To use the App Store, I had to add to /Extra/com.apple.Boot.plist:
    <key>EthernetBuiltin</key>
    <string>Yes</string>
- I'm currently experimenting with LidSleep.kext. With 'Wake=Yes' and 'pmset -a hibernatemode 1' and this package, sleep is working sometimes.
- Got CPU Temperature, Ambient Temperature and Fan Speed in SMC Monitor/iStat after patching DSDT and changing monitor to MONITOR in the FakeSMC's ACPIMonitor.kext files (used package Release_10.6_rev493.zip).
| Parts | Device | Working | Notes |
|---|---|---|---|
| Processor | Intel Core2Duo T7300 2GHz | Yes | |
| SATA/PATA | Intel ICH8 | Yes | for SSD Drive, patch needed to enable TRIM [6] |
| Graphics | Intel X3100 | Yes |
|
| Audio | AD1984 | Yes | either with VoodooHDA.kext or AzaliaTurboTP1984.kext or with patched AppleHDA.kext (with additional DSDT patch). |
| Wireless | Broadcom BCM94311MCAG | Yes |
|
| Ethernet | Intel 82566MM | Yes | Intel82566MM.kext |
| Mouse/Keyboard | Ultranav | Yes |
|
| Fingerprint | UPEK | Yes | TrueSuite for Mac |
| Bluetooth | BCM2045B | Yes | works after DSDT patch |
| Battery/Speedstep | Integrated | Yes |
|
lspci -nn
00:00.0 Host bridge [0600]: Intel Corporation Mobile PM965/GM965/GL960 Memory Controller Hub [8086:2a00] (rev 0c)
00:02.0 VGA compatible controller [0300]: Intel Corporation Mobile GM965/GL960 Integrated Graphics Controller [8086:2a02] (rev 0c)
00:02.1 Display controller [0380]: Intel Corporation Mobile GM965/GL960 Integrated Graphics Controller [8086:2a03] (rev 0c)
00:19.0 Ethernet controller [0200]: Intel Corporation 82566MM Gigabit Network Connection [8086:1049] (rev 03)
00:1a.0 USB Controller [0c03]: Intel Corporation 82801H (ICH8 Family) USB UHCI Controller #4 [8086:2834] (rev 03)
00:1a.1 USB Controller [0c03]: Intel Corporation 82801H (ICH8 Family) USB UHCI Controller #5 [8086:2835] (rev 03)
00:1a.7 USB Controller [0c03]: Intel Corporation 82801H (ICH8 Family) USB2 EHCI Controller #2 [8086:283a] (rev 03)
00:1b.0 Audio device [0403]: Intel Corporation 82801H (ICH8 Family) HD Audio Controller [8086:284b] (rev 03)
00:1c.0 PCI bridge [0604]: Intel Corporation 82801H (ICH8 Family) PCI Express Port 1 [8086:283f] (rev 03)
00:1c.1 PCI bridge [0604]: Intel Corporation 82801H (ICH8 Family) PCI Express Port 2 [8086:2841] (rev 03)
00:1c.2 PCI bridge [0604]: Intel Corporation 82801H (ICH8 Family) PCI Express Port 3 [8086:2843] (rev 03)
00:1c.3 PCI bridge [0604]: Intel Corporation 82801H (ICH8 Family) PCI Express Port 4 [8086:2845] (rev 03)
00:1c.4 PCI bridge [0604]: Intel Corporation 82801H (ICH8 Family) PCI Express Port 5 [8086:2847] (rev 03)
00:1d.0 USB Controller [0c03]: Intel Corporation 82801H (ICH8 Family) USB UHCI Controller #1 [8086:2830] (rev 03)
00:1d.1 USB Controller [0c03]: Intel Corporation 82801H (ICH8 Family) USB UHCI Controller #2 [8086:2831] (rev 03)
00:1d.2 USB Controller [0c03]: Intel Corporation 82801H (ICH8 Family) USB UHCI Controller #3 [8086:2832] (rev 03)
00:1d.7 USB Controller [0c03]: Intel Corporation 82801H (ICH8 Family) USB2 EHCI Controller #1 [8086:2836] (rev 03)
00:1e.0 PCI bridge [0604]: Intel Corporation 82801 Mobile PCI Bridge [8086:2448] (rev f3)
00:1f.0 ISA bridge [0601]: Intel Corporation 82801HBM (ICH8M-E) LPC Interface Controller [8086:2811] (rev 03)
00:1f.2 IDE interface [0101]: Intel Corporation 82801HBM/HEM (ICH8M/ICH8M-E) SATA IDE Controller [8086:2828] (rev 03)
00:1f.3 SMBus [0c05]: Intel Corporation 82801H (ICH8 Family) SMBus Controller [8086:283e] (rev 03)
03:00.0 Network controller [0280]: Broadcom Corporation BCM4312 802.11a/b/g [14e4:4312] (rev 01)
15:00.0 CardBus bridge [0607]: Ricoh Co Ltd RL5c476 II [1180:0476] (rev b6)
The "Undervolting" Guide
Archived source obtained from: http://forum.notebookreview.com/hardware-components-aftermarket-upgrades/235824-undervolting-guide.html
Another note, I've bundled the signed 64-bit driver in the "rmclock_235.zip" package, as well as the .bin.exe that came from RightMark's website.
This guide is written by flipfire along with the ideas, knowledge and help of other members. This guide covers most bits about undervolting while keeping it simple and accurate as possible. This method should also work with supported processors as the concepts outlined remains the same.
For this guide, I will be using a Santa Rosa T7500 processor on Vista using RMclock v2.35
I recommend undervolting to anyone with enough confidence and knowledge to do so. The benefits easily outweigh the risks. I don't see why one shouldn’t do this for a cool adn better notebook experience.
What is Undervolting?
Undervolting is a process which reduces the excess "voltage" given to the CPU using a software. This is widely used as a cooling solution and in my opinion more effective than any other cooling solution available (thermal paste, cooling pad, etc) at NO cost. Results can vary from 5c up to 30c drop in temperature, most will achieve an average of 10c.
Undervolting will NOT compromise performance at all. Underclocking and Overclocking (clock speeds) is whats responsible in regards to performance. Benchmarks will also prove that performance remains the same. Most beginners usually think and assume undervolting will sacrifice performance but they are wrong.
So you’re probably wondering how this works out and why Intel/AMD didn’t do this before hand..WHY? HOW?
Not all processor chips are built equally. Each individual processor have different voltage tolerances. Instead of Intel tuning each chip's voltage individually for the lowest voltage possible and risking instability, they made a fully stable standard voltage for all chips to run on. The problem is this standard factory voltage they put is quite high. Undervolting takes advantage of this by reducing it to the right amount.
This is also why some people can undervolt more than others even with the exact same model processor. It’s like the same concept for overclocking, some can go higher, some cant. Unlike overclocking, Undervolting will not void your warranty or damage your hardware.
Bottom line is.. There is no catch to undervolting.
*Advantages of Undervolting
- Cooler CPU (5 to 20c cooler)
- More battery life (15-30mins more)
- Less Fan noise & activity
- Longer overall notebook life
- Eco-Friendly
By reducing the voltage fed to the CPU, it will run much cooler. It will also draw less power from the battery which can give you an extra 10-30+mins battery life depending on the degree of the undervolt. Also a cooler CPU means less fan activity which again points to more battery life and less fan noise. A Cooler CPU could also lead to a cooler GPU if they share the same heatsink/fan. It is common sense that a cooler running notebook will last longer than a warmer/hotter counterpart. Heat is the killer of electronic parts.
*Disadvantages/Risks
- BSOD (Blue Screen of Death)
You will get a BSOD at the very most if the voltages are too low. This is why we do a stability test to make sure we get no BSODs. If the voltages are setup properly you shouldn’t get any at all. A BSOD seems to be the only risk for undervolting in my experience. So make sure everything is saved before you do anything. I don't wanna be responsible for any loss or hoo-haa's.
You will need to download these programs (don't install RMclock yet). Click to go on download page
- RMclock v.2.35 - (CPU clock utility)
- ORTHOS CPU Loader - (Used to stress the CPU and test for stability)
- HWmonitor [External Link] - (Choose between 32/64bit on top left corner)
(ORTHOS and HWmonitor do not need to be installed . They are just .exe programs)
1)***Checking Max temps before Undervolt***
Firstly, We need to find out how hot your CPU gets when under load to compare what undervolting can achieve.
i) Open HWmonitor. It will show the CPU/GPU/HDD's maximum, minimum and current temps. Today we are only going to be looking at the CPU core temps. I recommend using HWmonitor because its one of the best temp programs and its accurate but others will work too.
ii) Run ORTHOS CPU Loader. This handy program will simulate full cpu load for both cores.
iii) Click on the Start button and let it run for 10mins. Watch the temps shoot up to about 70-90c.
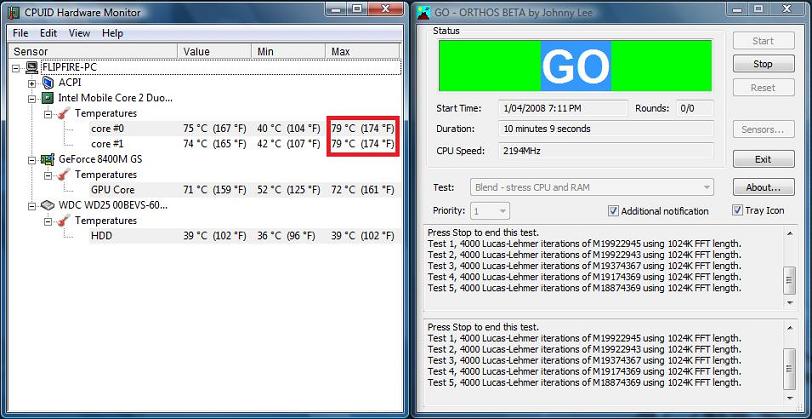
iv) Once its done stressing the CPU for 10mins, stop the program and record the maximum temp.
-I managed to get a scorching temperature of 79c.
2) ***Installing and setting up RMclock***
Note: Vista x64 users will need to download the signed 64bit drivers down below to make RMclock work.
i) Unzip/Install RMclock into your notebook
ii) Run RMclock
iii) Click on the "Advanced CPU Settings" tab. The latest version of RMclock should automatically detect your CPU. If it doesn’t then click on the "Mobile" radio button near the bottom and tick "Apply these settings at startup". Now hit the Apply button
*AMD users need to tick P-State Transistors for a better undervolt
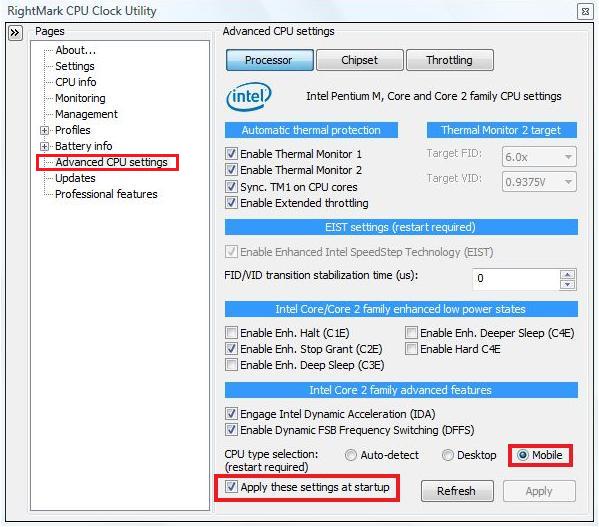
- If it asks you to restart the program, do so. After it has restarted go to the "CPU info" tab. Double check its showing the correct processor you have. On this page you will also see a lot of digits moving up and down about your CPU.
3)***Setting up Profile***
i) Double click on the Profile tab then click on "Performance on Demand" sub-profile.
- Tick "Use P-State Transitions" for both AC Power and Battery
- Tick all the index boxes possible, Make sure to scroll down and click the others
- Click Apply when all done.
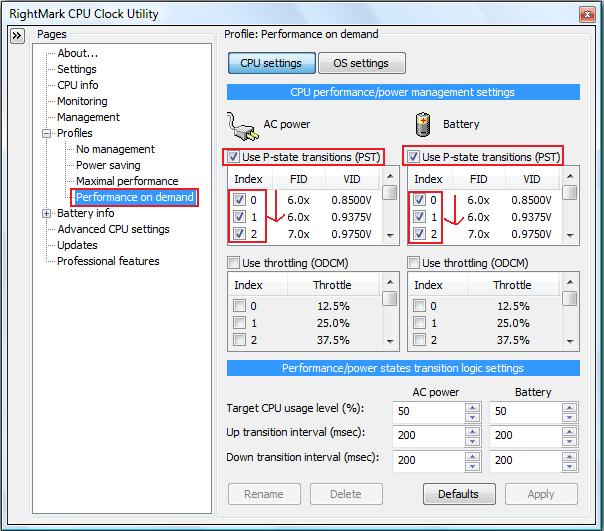
Now we head back to the Main Profile page....
ii) Change the current profile in the drop down box to "Performance on Demand" for both AC Power and Battery
-Make sure all the index boxes are ticked. If you have SuperLFM or IDA I suggest leaving this out for the meantime. See down below later on for what these features do.
iii) Untick "Auto Adjust intermediate-states VID" near the bottom and hit the Default button. Your factory voltages should now show up. Click Apply.
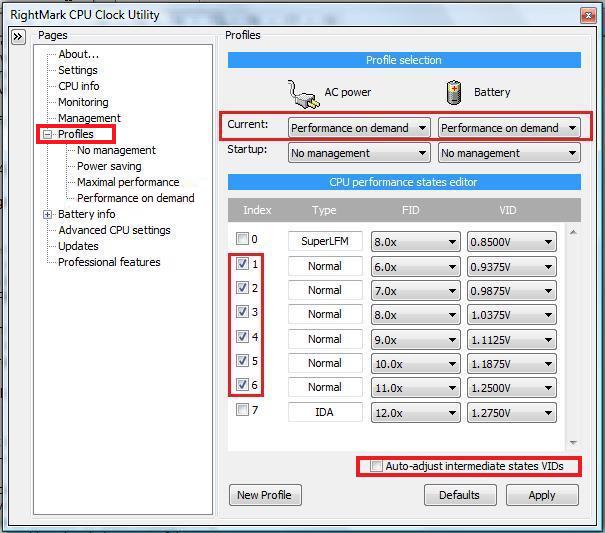
4) ***Undervolting***
In the main profile page, you will see different multipliers and voltages. What are multipliers?
Multipliers are incorporated with Intel SpeedStep Technology (see down below for full definition). Instead of the CPU running at full power all the time, multipliers are used to dynamically lower the clock speeds to make the CPU run more efficiently.
The more CPU power you need, the higher the multiplier your CPU will use. The higher the multiplier, the higher the corresponding clock speed will be. The higher the clockspeed, the more voltage it requires to run (vice versa)
i) First, We are going to start lowering the highest multiplier's voltage which is the 11x multiplier for me.
-Most people should be able to lower it by at least .100v to begin with the initial testing then slowly decreasing it from there on
ii) Always click Apply so the new voltage can take effect then do the stability test below. Keep doing this everytime you lower the voltage
5) ***Testing Stability*** (make sure all work is saved!)
- Open ORTHOS and HWMonitor again. (we will now see how much cooler it is)
- Go to the "CPU info" tab of RMclock (you can also watch the temps and stats here).
- Set the test type to "Small FFTs - stress cpu" to concentrate the test to the cpu.
- Run ORTHOS stress test for 45mins or more
- If it doesn’t crash when the stability test is done then you can go lower. I suggest lowering by .025v at a time till it BSOD or gives a warning error.
*If you get a bluescreen - then you have reached your limit and the voltage is too low. Once it restarts from the BSOD, it should revert to the last stable voltages. Keep a record of the good/bad voltages on paper.
*If you get a warning or hardware error from ORTHOS - Your voltage is also too low. Raise your voltage and try again.
-Once you have found your unstable voltage, I suggest raising the voltage up by 2 steps. This will put a safe margin away from your unstable voltage to ensure stability
**Its normal to get a BSOD or error at some point so don't freak out. It wont do any hardware damage.
**Most people are able to achieve .150v to .250v less than their default voltages for the highest multiplier. Again, it all depends on your processors tolerances.
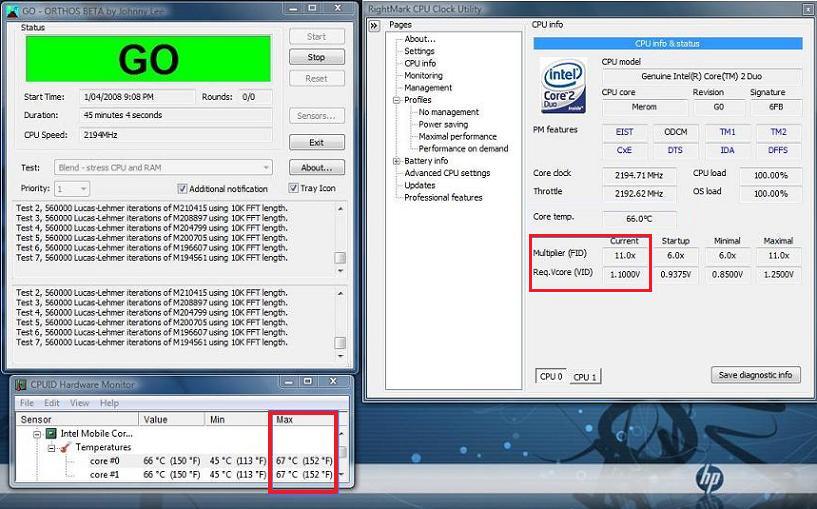
6) ***Results***
After several changes and stability tests I was able to lower it to 1.100v that’s .150 volts less than my standard voltage (1.250v). My undervolt isn’t as great compared to how low others can achieve but it has made a significant difference.
My max temps before undervolting was a scorching 79c now it is only 67c! That’s a big 12c shaved off at the cost of nothing.
I cannot accurately calculate how much extra battery life this will give cause of too many variables. I can only estimate about 15-25mins by perception as I haven't got proper benchmarking programs and monitors. From what other users have posted, they saw an average of 10watt difference which should reduce the strain on your hot power adapters.
When you have found your optimum voltage settings, I suggest doing a further 3 hour stress test (when you have spare time) to make sure it is 100% stable.
Once you have made sure this voltage stable, you can now choose to make these settings run at startup:
Go to the Main Profile page > On the drop down box for startup choose "Performance on Demand" > Hit Apply
Now go to Settings page > Tick "Start Minimized in Windows Tray" and "Run at windows startup" > Hit Apply
To show your CPU temps in the Taskbar/System Tray > Right click the RMclock wheel icon and click "Show CPU Temperature"
TA-DA! Enjoy! Watch your notebook run significantly cooler
Side Notes:
- RMclock cannot recognize CPU's with half multipliers. It will round off to the nearest whole number thus downclocking. T8100/T9300/P7350/P8400/P9500 will underclock by 100mhz~
- The undervolt will only be in effect when RMclock is on.
- The latest CPU-Z is bugged and will show incorrect voltages, use v1.41 (this is probably no longer the case in 2026 and beyond)
- If you untick a box in the Main Profile page, you will need to retick them again in the 'Sub-Profile' page
- If your CPU is overclocked, make sure you undervolt when it is OC'd, so you can find the optimal voltages of the OC'd speeds.
7) ***Lowering and Testing Other Multipliers voltages***
o make the most out of Undervolting, you can also lower the other multipliers to its optimum voltages. So far we have only set and tested the max multiplier. The lower the multiplier #, the less voltage is needs.
To do the stability test on the other multipliers we will need to disable the highest multiplier by Unticking it in the Main Profile page (11x multiplier for me) then clicking Apply. This will stop the CPU from using this multiplier meaning the 10x multiplier meaning this is the highest speed your CPU will reach. Each multiplier corresponds to a clock speed 11x is 2.2ghz, 10x is 2ghz, 9x is 1.8 (for my CPU of course)
Now you know the drill...
- Lower the voltages slowly
- Run ORTHOS test for 45mins
- Double check in CPU Info page or CPU-Z that its stressing and maxing out at the correct multiplier
- Find the optimum voltage
- Move on to the next multiplier by unticking the higher multiplier profile page then back to step 1
You do not need to test the lowest multiplier (idle) because we cant change/never changed the voltage. This voltage will always set at a stable voltage
Its a time consuming process getting the optimum stable voltages for every multiplier but it pays off in the end.
Note: After you're done, make sure you re-tick the multiplier boxes in the "Main Profile" page then "Performance on Demand" sub-profile page, If you don't your CPU will be majorly handicapped
The lower the multiplier #, the more sensitive the voltage is to a BSOD! Most BSODs from undervolting are usually because of unstable lower multipliers. For first time undervolters I suggest leaving a small voltage margin from your unstable voltages.
Quicker Alternative: If you don't have to time to stability test every multiplier there is another way. Ticking the "Auto-adjust Intermediate States" box will fill in all the multipliers in between your Idle (6x) to your highest multiplier accordingly. It seems to work well for at most cases but theres no guarantee that all the multipliers are 100% stable, since it just fills it in mathematically. It seems to work fine for most people though.
Extra! Locking CPU to full speed/throttle
RMclock offers different power profiles. The Maximal Performance is profile allows you to choose only 1 multiplier which will be locked at that multiplier/clockspeed.
This profile is great for gamers, certain scenarios where full cpu is needed and people having issues with Speedstep not switching properly. I only recommend using this profile when the notebook is plugged into the AC adapter because it will increase the drain on your battery.
Locking the CPU will reduce the small throttle lag you get from the usual dynamic multiplier switching. It improved my PCMark05 points when I locked it to full speed.
To lock the CPU to full speed:
i) Go to the Maximal Performance Sub-profile page
- Tick 'Use P-State Transition'
- Tick the multiplier you want to lock the speed at (Choose the highest index #)
- Click Apply
ii) Go to the Main Profile Page
- Select the Maximal Performance on the drop down boxes for AC Power Current and Startup
- Click Apply
If successful, you should notice the RMclock wheel icon in the system tray turn completely red. This signifies the speed is locked to maximum speed.
This configuration will only lock the CPU when you are on AC power. When it is unplugged, it will change to dynamic switching (Speedstep) for improved power consumption. You can also choose to underclock the CPU when using the battery for longer battery times.
Extra! How to Underclock CPU using RMclock
The current profile we have is dynamic which means it will only use up as much cpu power as it needs. Underclocking is only useful if you want to completely limit your CPU's top speed for certain specific reasons. Obviously your notebook will run relatively slower depending on the underclock.
If you have tested the 'other multipliers' above this and haven’t realised it... then you actually have unknowingly underclocked. By unticking the index/multipliers in the Main Profile page, you are disabling the multiplier/speeds the CPU can use. So it's common sense that we untick the higher multipliers. Make sure to hit Apply and check the CPU info page
What is Intel SpeedStep Technology?
"SpeedStep allows the clock speed of a processor to be dynamically changed by software. Running the processor at higher clock speeds allows for better performance. However, when the processor is run at a lower speed, its core voltage can be reduced, allowing for reduced power consumption and heat dissipation."
In basic terms, instead of the CPU always running at full throttle all the time, speedstep dynamically lowers the clock speed using multipliers to make the CPU run more efficient. It will only use up as much CPU power when it needs too.
What is SuperLFM and IDA?
SuperLFM stands for Super Low Frequency Mode. This ingenious feature lets your processor idle at an even lower clock speed by dynamically cutting the FSB in half. In turn, means even lower clock and voltages thus more battery life and efficiency. On a T7500 I was able to make my CPU idle on 600mhz @ 0.850v instead of the default 1200mhz @ 0.937v . This feature is only available on the Santa Rosa Platform, T7xxx CPU's and above using the v2.35 of RMclock.
To enable SuperLFM, Go to the Main Profile page
- Tick Index 0 which should be named SuperLFM
- Set the FID to 6x instead of the default 8x. The default voltage is usually the correct one. If it's not, then try putting it down to the lowest voltage possible. The lowest voltage varies from your CPU model
- Go to the 'Performance on Demand' sub profile page and make sure the P-State Transition box for Index 0 is ticked.
- Hit Apply after all done, then check the CPU Info page for the superlow frequency and/or voltage
IDA stands for Intel Dynamic Acceleration. Basically it uses one core while the other rests. Im not really a big fan of this feature because it's buggy and the gains are negligible so I just kept it turned off. This will probably help explain it better.
RMclock for Vista 64bit users
A digitally signed/secure driver is required for RMclock to run on Vista 64bit. We have finally acquired a digitally signed driver for RMclock!
Here is the file for the signed RTCore64.sys driver (virus free and tested)
Download and extract it to your RMclock folder and overwrite the old driver.
(NOTE: This driver is only for Vista 64bit. The XP 64bit drivers are already included with the standard installation)
search tags: undervolt undervolting undervolted underclock undervolt guide
I'd like to give credit to: blackbird (I followed his guide on my first time), John Ratsey for the signed x64 drivers, Rightmark, CPUID, ORTHOS and anyone else who I didn’t get to mention. (Let me know)