Personal System/2 Model 80 Information and Software
System Type: 8580
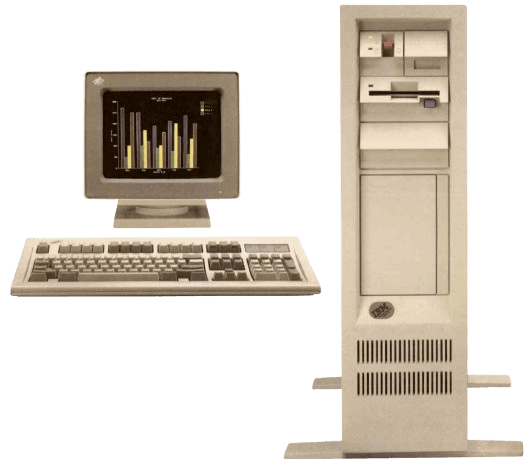
The IBM PS/2 Model 80 was a higher-end workstation class computer released in 1987.
A lot of these particular machines found use in many businesses and schools: making them a more common model to be found. The reason being that they offered some of the larger storage methods (being able to hold two 5.25" full height hard disks), and also supporting many Micro Channel memory card add-ons to expand the system's memory beyond what would have been possible with conventional SIMMs. Generally these were aimed as workstations, whereas an end user would have commonly purchased something like a PS/2 Model 50.
Downloads
Manuals
- PS/2 Model 80 Technical Reference
- ESDI Fixed Disk Drive Adapter/A Technical Reference
- Personal System/2 3.5-inch Diskette Drives Technical Reference
- PS/2 Model 80 Brochure (Early)
- PS/2 Model 80 Brochure (Later)
Firmware, Drivers, & Software
- Reference Diskette v1.12 (03-22-90, 1.44MB)
- Reference Diskette (Reply) v1.06 (11-05-93, 1.44MB)Use this Reference Diskette if you have the Reply (Options by IBM) Planar Upgrade installed.
- Reply (Options By IBM) Planar Upgrade Flash BIOS Update v1.38 (11-08-95, 1.44MB)
- Blue-Lightning Processor Upgrade Utility Diskette (08-13-93, 720K)
- 160MB SCSI Fixed Diskette Mode-Select Restoration Diskette (03-06-91, 720K)Fixes data transfer failures that can occur with 160MB SCSI disks in models 8580-161, 8590-0J9, and 8595-0J9.
- Enhanced Memory Adapter with ROM Update v1.03 (03-15-93, 1.44MB)Allow Enhanced Memory Adapter with ROM to enable all memory contained on all installed Enhanced Memory Adapters.
Model 80 Announcement
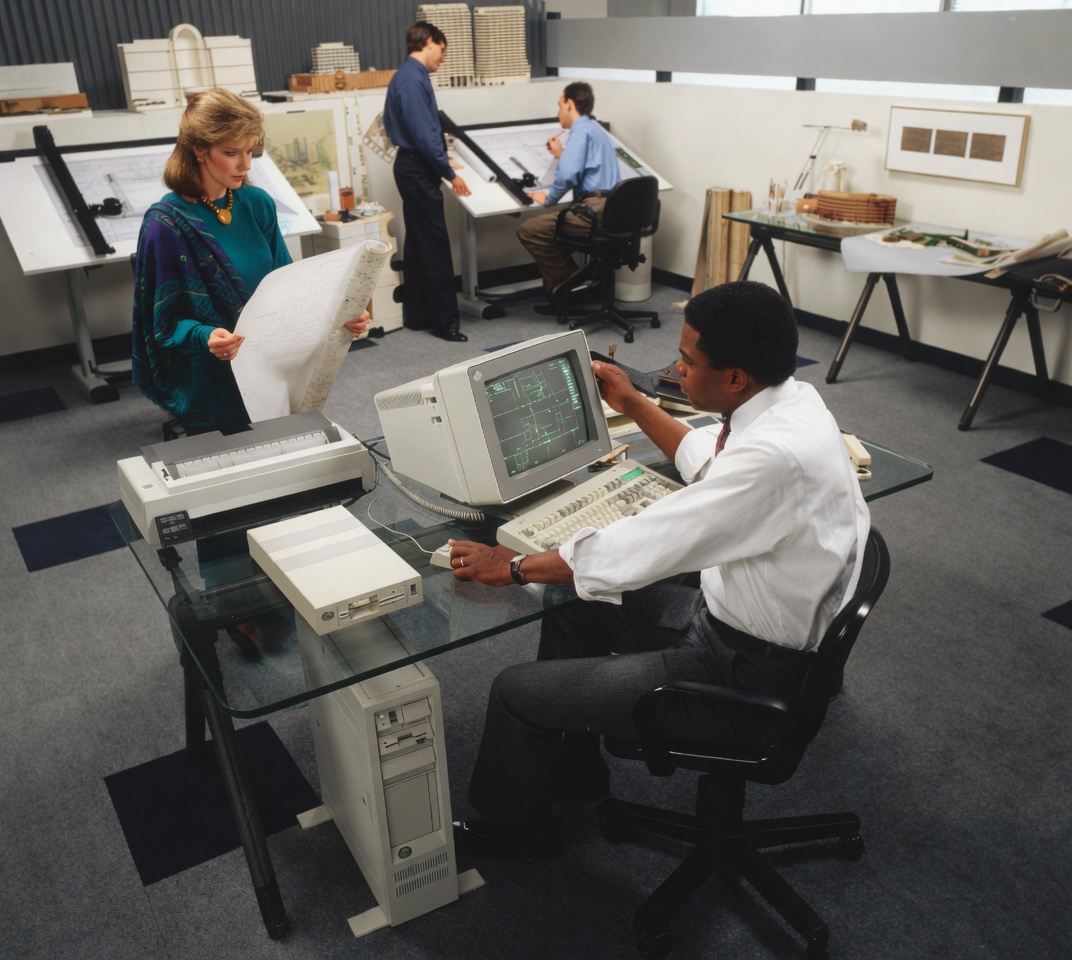
Enhanced performance, sharper graphics: the most powerful of the new systems announced today -- the IBM Personal System/2™ Model 80 -- is a floor-standing model available in three configurations. It is ideal for environments like the architectural firm above, where uses require a high-performance system to solve complex mathematical, scientific and engineering problems. With the IBM Personal System/2 Color Display Model 8514, a 16-inch high-addressability display shown above, users can expect high quality, sharper-definition graphics and the capability to choose up to 256 colors out of a palette of more than 256,000. On the table at the left is the IBM 5.25-inch External Diskette Drive. Behind it is the new IBM Proprinter™ XL 24. IBM Personal System/2 and Proprinter are trademarks of IBM Corporation.
Model Differences
There were some fairly major differences between early and later Model 80s (really the later versions are completely redesigned from the original-- just using many of the same components). Here are a comparison of some of the differences along with variances of the motherboards-- keep in mind that some earlier machines could have some later components (such as later FDDs), there's no 'law' defining these to be absolute.
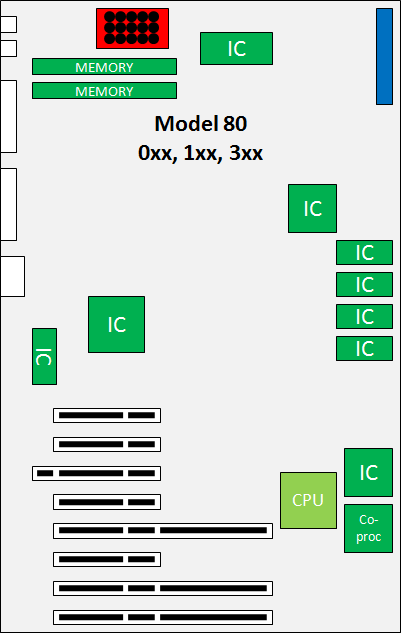
8580 0x1, 1x1, 3x1
- Early style PS/2 floppy drives (larger button, LED on the top left)
- ESDI equipped HDDs
- No CPU cache
- CPU positioned to the right of the board
- Maximum of 4 MB for internal memory (two 2MB cards)
8580 Axx
- Later style PS/2 floppy drives (smaller button, LED on the bottom left)
- SCSI equipped HDDs
- CPU cache
- CPU under the PSU fan
- Maximum of 8 MB for internal memory (two 4MB cards)
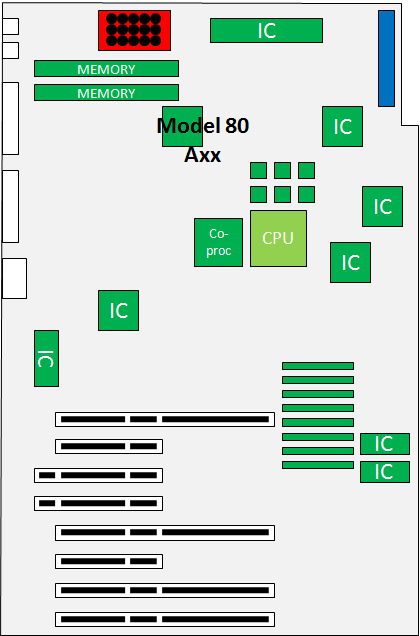
It's really idiotic that only the later systems had cache added: IBM could have at least made cache an 'option' rather than exclude it entirely on the "0x1, 1x1, 3x1" motherboards.
Model 80 Restoration
Like many PS/2s and PS/2 peripherals, the Model 80 uses the tri-lead tantalum. You can order either Kement replacements with the same polarity arrangement, or replace them with standard electrolytic capacitors. Since they're vintage tantalums, they can explode, and have been recorded to explode in various systems from age. No idea why that one guy at Vogons _insisted_ they never had any issues, a bizarre position to take given the chemical makeup of tantalums (the solid tantalum pentoxide dielectric, this isn't news to anyone).

Always solder the positive lead to the center, it doesn't matter which negative hole you use. This system was developed so it didn't matter which orientation the pick-and-place machine would deploy the components.
In regard to recapping the power supplies (which I highly recommend), use power supply series capacitors for the two decouplers. Depending on which power supply you have, you may receive one which is riveted shut, or if you're lucky it'll have security torx bits allowing it to easily open up. The PSUs that are riveted shut will have LOW QUALITY electrolytics inside which can lead to a failure if they're not replaced in time.
DO NOT RECAP THE POWER SUPPLY IF IT HAS RECENTLY BEEN POWERED ON. LET IT SIT FOR A FEW DAYS. Also ensure the large capacitors are discharged when you start working on it just in case. Proceed at your own risk, this can be highly dangerous and I take no responsibility for your actions.
The diskette drives on the Model 80 (and any other corresponding PS/2s that use the same FRU) are noted to develop problems over a period of time. The best ones to work with are the Mitsubishi drives (MF355W-99M3). If the capacitors have failed, simply rock them side-to-side until they snap off-- then solder on a through-hole capacitor on its side, ensure the leads don't touch anything else. The traces are very strong so don't worry about breaking anything. I tried removing the original surface mount capacitors the 'right' way, but it ended up (ironically) damaging the pad as the solder is just too old to work with and didn't melt properly. It's funny as Adrian Black mentioned a similar thing (and ends up just clipping off the SMD capacitors like I do as well).
Blue Lightning Upgrade on the Model 80
There are some very important things you need to know when you have the blue lightning upgrade installed in your model 80: granted not many systems have it installed as I take it these upgrade kits sold in few numbers. Be aware that the Blue Lightning has L1 cache which the 386 bus isn't 'native' to which can require it to being disabled. If you don't you'll most likely get the error code '00010400' in the reference diskette system test. The IBM documentation covers here:
IBM PS/2 Blue Lightning Processor Upgrade
FRU P/N 13H6701
MKT P/N OP7080Y
The Blue Lightning Processor replaces the 80386DX microprocessor on the system board and emulates the presence of the original 80386DX, so no special software is required. The Blue Lightning Processor Upgrade is fully compatible with operating systems that are capable of running on an 80486 microprocessor. (incl. OS/2 and DOS)
It also supports bus mastering adapters, if they are present in the system.
Important Always run the DIAGNOSTIC TESTs with the Blue Lightning Processor Upgrade cache disabled. (BANK-1 SW-1 OFF = cache disable for testing purposes !)
In some cases, with the Blue Lightning installed, the diagnostic tests might indicate an error. Try to replace the Upgrade board with the origin 386DX. If the diags are OK the adapter is fully functional and will also work with the Blue Lightning Upgrade.
This Processor update can be installed on one of the following computers: 8570, 8580 with 80386 Microprocessors.
You must use 8570/80 Reference Diskette Version 1.10 or later.
The upgrade kit contains:
- Blue Lightning Processor Upgrade board
- 132-Pin PGA Socket Extender (only needed for 8580 mod. 111, 121, 311 or 321)
- Processor removal tool
- Utility Diskette
- Label (POWERED BY BLUE LIGHTNING)

Default Switch settings are:
| Switch Bank 1 | SW‑1 | SW‑2 | SW‑3 | SW‑4 | ||
| ON | Off | Off | Off | |||
| Switch Bank 2 | SW‑1 | SW‑2 | SW‑3 | SW‑4 | SW‑5 | SW‑6 |
| ON | ON | ON | Off | ON | Off |
Switch Bank 1 function
| SW # | Setting | Controls | Remarks |
|---|---|---|---|
| 1 | ON (D) Off | Cache on at startup Cache off at startup | this switch is only read at Power‑ON. |
| 2 | ON Off (D) | Flush cache on INT 9 Do not flush cache on INT 9 | - |
| 3 | ON Off (D) | Flush cache on INT 10d Do not flush cache on INT 10d | - |
| 4 | ON Off (D) | Flush cache on INT 11d Do not flush cache on INT 11d | - |
Switch Bank 2 function
| SW # | Setting | Controls | Remarks |
|---|---|---|---|
| 1 | ON (D) Off | Flush cache on INT 14d Do not flush cache on INT 14d | - |
| 2 | ON (D) Off | Fast RAM count Slow RAM count | This switch caches the read‑only (ROM) from the adapters. This only affects the power‑on self‑test. If the computer stops after the RAM count is complete, turn this switch OFF and restart the computer. The RAM count is slower; performance after startup is not affected. |
| 3 | ON (D) Off | Cache all extended memory No caching from 14MB to 16MB | Set this switch to OFF if you have memory‑mapped devices that use memory in the 14MB–16MB region. |
| 4 | Off (D) | (Reserved) | Do not change this switch |
| 5 | ON (D) | (Reserved) | Do not change this switch |
| 6 | ON Off (D) | Flush cache on INT 15d Do not flush cache on INT 15d | If you have a SCSI hard disk drive, this switch must be set to ON. |
Installing the Blue Lightning Upgrade
- Power-OFF the computer
- Remove the Power-Cable
- Open/lift the Machine cover
- Remove Hard Disk(s) / Adapters (so you can freely operate with the already installed Microprocessor)
- Locate the Processor on the System Board (Pin 1)
- Remove the Processor (80386)
- If the machine is a 8580 mod 111 121 311 or 321 then install the 132-Pin PGA socket Extender (Pin-1 to Pin-1)
- Install the Blue Lightning Board into Processor/PGA socket (be sure PIN-1 to Pin-1)
- If your machine have an SCSI Adapter, then on Switch Bank 2 / SW-6 must be set to ON.
- Reinstall all previously removed Cable/Adapter
- Reconnect the Power cord
- Power-ON the system
Utility Diskette
To control the cache speed under OS/2 or DOS (but not a DOS session under OS/2) without restarting the computer, insert the Utility Diskette in drive A and at the prompt:
- Type A: to change to the root directory of drive A.
- Type slow to disable the Blue Lightning cache
--- or ---
Type fast to enable the Blue Lightning cache.
To permanently affect caching options, use SW-1 on bank 1.
FRUs for various pieces of hardware
As usual it can be difficult to scour for common FRUs, so here are some notable ones.
- 4 MB SIMMs: 92F3337 (80ns) 92F0105 (70ns)
- 2 MB SIMMs: 92F0104 (85 ns) 92F0103 (80ns)
- Old style 'large button' 1.44 MB FDD: 72X8523