IBM T221 / T220 Information and Software
System Type: 9503 "Bertha"
The IBM T220 first debuted in 2001 and was the first (and apparently still last as of 2014) to feature "Wide Quad Ultra Extended Graphics Array" (WQUXGA). The later enahnced (and more well known) T221 came out in 2003 and was discontinued shortly thereafter in 2005. It was produced as a high density IPS monitor for high-resolution needs: invariably it showed up mostly in specialized professions and not purchased by many consumers due to the high price. It seems that it was pitched to be [intentionally] paired alongside an IntelliStation.
NOTE: As of October 16th 2014, Apple has released a 5K Retina iMac featuring a display of 5120 x 2880 -- officially being the first on beating the T221; it has 5.3 million more pixels. It took 13 years for this resolution to be surpassed.
One unique aspect pertaining to these monitors is that the intelligence regarding the resolution scaling is pixel perfect: meaning no gaussian blurs are required; unless the resolution is not 'even' disallowing proper pixel division. They are capable of scaling down properly to as low as 640x480.
T221 Downloads
--> T221 Firmware Update 1.5.1 (Windows 2000 through Windows 7)
*Requires a USB connection from the computer to the monitor--> T221 User's Guide
--> Installation & System Attachment Information
--> Converter Box User's Guide
--> EDID Settings
Differences between sub-types
Three major sub models of the T221 were produced, differences are quite substantial:
Type: DG1-- Originally was designed to operate with a Matrox G200, used LFH-60 cables exclusively, no DVI conversions. The card was included with the monitor interestingly enough. Runs at 41 Hz.
Type: DG3-- No longer came with LFH-60 cables exclusively, but had LFH-60 to DVI cables with a DVI equippemt graphics card (apparently). Runs at 41 Hz.
Type: DG5-- Uses an external breakout box taking both LFH-60 inputs into itself and breaking it out into four DVI outputs. It also comes with a single LFH-60 to a dual-bandwidth DVI converter (FRU 13M3200 | PN 55P5794). An additional converter box will be necessary if you are to run it with two dual DVI ports; otherwise you will need to design a converter for both yourself. It runs at 48 Hz. It is possible to overclock to 60 Hz, but as it can cause extra stress and isn't too noticeably different from 60 Hz, most likely best to keep it stock. It is also possible to make it work with virtually any new graphics card as well with doing some adjustments to the outputs. This last revision also has the least amount of 'ghosting' (the time it takes for the liquid crystals to change states). Still not as good as the L200p though.
DG5 FRUs
55P0995: T221 Video Cables 60 pin/2 DVI
13M3200: T221 Dual-Link DVI Converter Box Set
07N2194: T221 Stand Assembly
55P5077: T221 AC/DC Adapter
It's worth noting that due to the fact the T221s can use a maximum of 150 watts (primarily if the monitor is on maximum brightness), they have two cooling fans. Fortunately they're not very loud, but it's important that they are replaced/repaired if they fail.
Noisy Ground Loop
I've noticed (even with a brand new T221) that they inject a noisy ground loop into the power grid through the ground. This seems to affect all audio devices on the same power circuit. The manual does explicitly state you need a properly grounded connection which makes the problem seem as if this was known. I opened up the external power brick and Chemicon electrolytics were used: so the issue isn't due to the quality of the components but something with the design of the power supply.
The BEST solution to solve this problem is to purchase an ebtech Hum-X. I have confirmed this fixes the ground loop issue with the external power supply. The only other less desirable option would be to rework a different external power supply or remove the grounding pin.

Japanese Warranties?
Even though the design was conceived at the T. J. W. research center, much of the later implementation and manufacturing was sent to IBM Japan in coordination with IBM's (at the time) IDtech. As such, most warranties found with T221s are for Japan as many were later re-sold in North America. The warranty card has some unusual design features including repetition of the stripeless IBM logo:
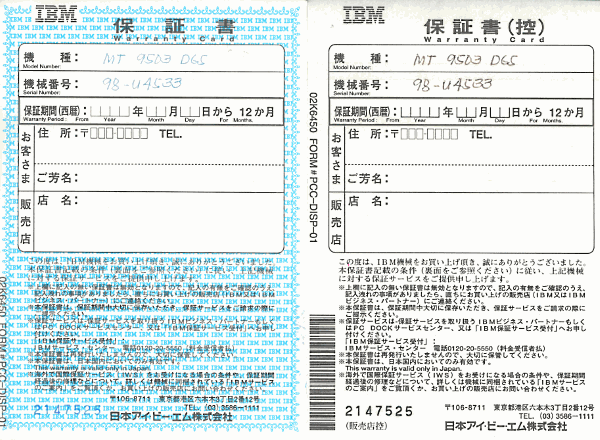
Another weird aspect is the fact that the model and serial are written out by hand. This would have been done for every T221 sold.
Configuring the T221 with nVidia Mosaic
NOTICE: because nVidia has restricted their advanced multi-monitoring software (mosaic) to Quadro cards, you must purchase a Quadro that has mosaic capabilities. nVidia cards (such as the GTX) will not work as they are restricted to nvidia surround; and nvidia surround does not work with the T221.
The card of choice I went with was an nVidia NVS 510 (because it has four inputs and can operate well with my System x 3300 M4; this particular system x refuses to work properly with AMD GPUs of any flavour). There are two ways to approach configuring the T221, the first one is more optimal, the second one less so. But before that is explain, here are the common resolutions you will be working with when setting up 'virtual monitors' to the T221 (as the T221 obviously can't receive a video signal from one connector, the controller divides the panel up into either four or two 'virtual monitors').
A) 920x2400
B) 1920x1200
C) 1920x2400
#1 using the nVidia supplied default resolutions
I've found that Mosaic does not work well with custom defined resolutions (to get around the quirk of the nvidia driver not being able to define a custom resolution, you can use ToastyX's CRU.EXE). So for example if we were to use four strips of 920x2400 @ 48 Hz or three quadrants of 1920x1200 @ 48 Hz, after the computer has been restarted, Mosaic attempts to corrupt the configuration to two virtual desktops while simultaneously still thinking there are four. Therefore, you have to disable and re-enable the mosaic configuration for it to operate correctly (only to have it break again once the computer is restarted).
Load up the NVIDIA Control Panel, go to Display > Change resolution. Go through each one of the 'IBM Digital Displays' and set them to 1920x1200, NVIDIA will default the values to 41 Hz. Then go to: Workstation > Set up Mosaic > Create new configuration. Select '4' for total displays from the dropdown, and choose the 2x2 topology.
After you enable Mosaic (feel free to power off the T221 for 8 seconds as the nVidia card will flicker through a bunch of garbage resolutions causing the T221 to power off and on rapidly). Once that's done, Mosaic will stupidly see it as one display at 3840x2400 and will assign it to 13 Hz. Go *back* a screen and set all of the IBM virtual displays in mosaic to 1920x1200 @ 41 Hz (before you hit Apply feel free to power off the T221 for 8 seconds again). Once that's done just go through the rest of the menus in mosaic and click finish.
#2 using custom resolutions for mosaic
Launch CRU.EXE (this is the custom resolution utility)
Assign all of the following virtual monitors this EDID value:
00 ff ff ff ff ff ff 00 24 4d 1f 25 00 00 00 00 04 0d 01 03 80 30 1e 78 ea 64 92 a3 57 4a 9c 25 15 50 54 2f cf 00 31 59 45 59 61 59 81 80 a9 40 01 01 01 01 01 01 f1 3b 80 60 72 60 1c 90 68 c8 13 00 e0 58 12 00 00 1c 42 3a 80 60 72 b0 1d 40 68 c8 13 00 e0 2c 11 00 00 1c da 33 c0 a0 30 60 45 90 30 20 3a 00 f0 58 02 00 00 1a 00 00 00 10 00 00 00 00 00 00 00 00 00 00 00 00 00 00 01 2d 02 03 04 00 00 00 00 00 00 00 00 00 00 00 00 00 00 00 00 00 00 00 00 00 00 00 00 00 00 00 00 00 00 00 00 00 00 00 00 00 00 00 00 00 00 00 00 00 00 00 00 00 00 00 00 00 00 00 00 00 00 00 00 00 00 00 00 00 00 00 00 00 00 00 00 00 00 00 00 00 00 00 00 00 00 00 00 00 00 00 00 00 00 00 00 00 00 00 00 00 00 00 00 00 00 00 00 00 00 00 00 00 00 00 00 00 00 00 00 00 00 00 00 00 00 00 00 f7
Credit for the hex value goes to 'wildpig' from here: https://forums.geforce.com/default/topic/788053/geforce-900-series/gtx-980-4-monitor-surround-and-the-ibm-t221/
Run the 'restart' executable after you have set the EDID values.
Load up the NVIDIA Control Panel, go to Display > Change resolution. Create a new custom resolution (in this case 920x2400 @ 48Hz or 1920x1200 @ 48Hz). Assign all of the virtual monitors the custom resolution once finished. Then go back to: Workstation > Set up Mosaic > Create new configuration. Select '4' for total displays from the dropdown, and choose the 2x2 topology if you're using 1920x1200, or 1x4 for 920x2400. Basically the same process as last time (Mosaic will see it as a single 3840x2400 monitor @ 13 Hz, so you need to go back, reassign the virtual monitors, and then complete the setup).
FINAL NOTE: these are the experiences that I had on my particular system running Windows 8.1. Your experience could differ depending on your OS and driver used.
Specifications
Resolution: 3840x2400
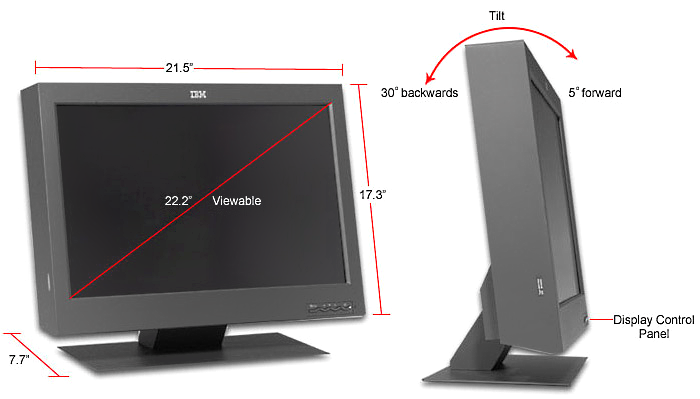
Screen Size: 22.2"
Refresh Rate DG1/DG3: 41 Hz
Refresh Rate DG5: 48 Hz (moddable to 60 Hz)